* Add qemu for arm builds on flatpak
* Increase timeout-minutes
Mainly meant to retrigger GitHub actions (free GitHub actions runners have a max runtime of 6 hours)
* Change arm64 flatpak to build barebones, rather than through emulation
This new addition is highlighted in GitHub's new blog post:
https://github.blog/changelog/2025-01-16-linux-arm64-hosted-runners-now-available-for-free-in-public-repositories-public-preview/
* Rename from arm64 to aarch64
* Potental fix for gst-plugins-good compilation
* Initial appimage arm64 builds
* Add inputs.arch variable
* Temporarily completely isolate arm64 and x86 dependencies
* Fix mesa download link and remove temp comments
* Disable libunwind in gst-plugins-good
* Revert changes in build_check_cache.yml
* Disable nls & static options in gst-plugins-good
* Rebase on main
* Re-add flatpak arm build
* Update gst-plugins-good to 1.24.10
This should be the version that received complete arm64 support
* Trying a solution
* Revert "Update gst-plugins-good to 1.24.10"
This reverts commit b416dcd0ae.
* Remove previous build-options
* Try installing the proper arch version of Meson
When building on a local arm64 device it runs properly.
* Remove sudo commands
* Use dnf rather than apt-get
* Try installing meson before the flatpak builder
* Change flatpak runner
This uses a more experimental version of the flatpak runner provided by Flathub
* Temporarily enable artifact upload
* Resolve merge conflicts
* Add arch variable into flatpak name
* Revert to using Gnome 46, rather than Gnome 47
* Add curl dependency
* Revert "Add curl dependency"
This reverts commit 888a0c4a75.
* Clean up
* Define ubuntu version
Seems to be needed due to the arm version still being in public beta
* Add SV06 high-speed settings which were incomplete earlier
Signed-off-by: Apoorv Parle <19315187+apparle@users.noreply.github.com>
* Remove SV06 PLA filament and use Generic filaments. Also enable other types of filaments.
Signed-off-by: Apoorv Parle <19315187+apparle@users.noreply.github.com>
* Merge branch 'main' into sv06_high_speed
* ImGuizmo: Comment out unused code
* 3DNav: Avoid gimbal lock by using polar coordinates
* 3DNav: Make sure top and bottom are oriented correctly
* Add auto perspective
* Add options
---------
Co-authored-by: SoftFever <softfeverever@gmail.com>
* Introduce option to control number of skirt walls after first layer
* Merge branch 'main' into Introduce-option-to-control-number-of-walls-on-skirt-after-first-layer
* Merge branch 'main' into Introduce-option-to-control-number-of-walls-on-skirt-after-first-layer
* One wall draft shield options refactor
* Merge remote-tracking branch 'upstream/main' into Introduce-option-to-control-number-of-walls-on-skirt-after-first-layer
* Merge branch 'main' into Introduce-option-to-control-number-of-walls-on-skirt-after-first-layer
* Renamed to single loop draft shield
* Merge branch 'main' into Introduce-option-to-control-number-of-walls-on-skirt-after-first-layer
* Merge branch 'main' into Introduce-option-to-control-number-of-walls-on-skirt-after-first-layer
* Update Artillery Genius & Sidewinder profiles
- Fixed bed-size of Genius (Pro) profile.
- Fixed default retraction values for the Artillery Genius (Pro) 0.4 profile,
which were set too high for this direct-drive machine.
- Slightly increased default retraction value for Sidewinder X1 & X2, to match
the Genius profiles. Tested values on all machines.
- Matching minimum layer height for Genius & Sidewinder profiles.
- Fixed line endings & indentation.
* Check for air filtration support on the printer level before emitting air filtration gcode command
* Merge branch 'main' into Check-air-filtration-support-at-the-printer-level-too
* Removed expand factor from IOI as it was incorrectly causing perimeter failing to observe IOI reordering.
* Merge branch 'main' into Bug-Fix-IOI-re-ordering-failing-to-reorder-in-certain-edge-cases
* Update Italian translation
* Fix Italian translation
* Fix Italian translation
* Fix Italian translation
---------
Co-authored-by: Noisyfox <timemanager.rick@gmail.com>
The default build plate model for Creality K2 Plus is heavy (516kB) and has a lot of visible artefacts - like diagonal "stairs". I found this a bit annoying. So I redrew the file - to a simple flat stl - 16kb.
* fix alignments for tab and sidebar icons
* minimize code changes
* minimize code changes
* minimize code changes
* Align config label with group title
* minimize changes
* Update Plater.cpp
* Update spacing after titlebar text and comments
* Update Plater.cpp
* Update OG_CustomCtrl.cpp
* Use class to control values from one place
* fix error
* Update Plater.cpp
* update
Move init sys font into GUI_App, after logging has been set up properly (#8603)
This avoid annoying messagebox if somehow failed to load font on windows, and write the message into log files instead
* Fix pt-BR translation of "raft" and "draft"
* Fix the pt-BR translations of "bridge"
* Fix the pt-BR translations of "skirt"
* Fix the pt-BR translations of "fuzzy skin"
* Fix the pt-BR translations of "pellets"
* Fix and uniformize the pt-BR translations of "bed" and "plate"
According to https://eigen.tuxfamily.org/dox/TopicPitfalls.html one
should just avoid using `auto` as the type of an Eigen expression.
This PR fixes most of them I could found in the project. There might be
cases that I missed, and I might update those later if I noticed.
This should prevent issues like #7741 and hopefully fix some mysterious
crashes happened inside Eigen calls.
* Fix the pt-BR translation of "extruder" e "multi-material",
* Fix pt-BR translation of "prime tower"
* Fix translation of "wall", "perimeter" and "shell"
* Add files via upload
Added Lulzbot Taz 6 profile, and supporting files images to add other printers in the future.
* Add bed model and image for Taz Pro
* Filament name clarifications and prep for GFL
* Changes to align with GFL
* GFL Integrated
* Update version # to reflect changes to use GFL
* format cleanup
* cleanup format
* cleanup format
* correct discrepancy on max acceleration label/value
---------
Co-authored-by: SoftFever <softfeverever@gmail.com>
* Revert "fix more Flashforge issues"
This reverts commit 6e473fd5fa.
* Revert "Fixed an issue that some Flashforge filament profiles don't' have compatible_printers defined which cause filament selection dialog didn't filter properly"
This reverts commit f8c0cdfb11.
* Revert "Merged Orca-Flashforge 1.3 branch (Added AD5X & G4P) + fixes & optimizations (#8461)"
This reverts commit b8e4ce75e0, reversing
changes made to be8bf54884.
* Fix OCCT and OpenCV patching during build
The inclusion of the `--directory` flag here isn't necessary because of
how `PATCH_COMMAND` applies patches. In fact this causes issues when
trying to build from an archive, `--directory` seems to imply `--index`
and thus this patch only succeeds if you're inside an initialized git
repo. If you simply use the archive without a git repo the build fails
at the patch step.
* Alter patch command based on git repo status
`git apply` has different behavior when inside a git repo vs not. If
we're in a git repo we need to fully quality the path for these patches,
otherwise we can omit the directory flag.
---------
Co-authored-by: Joe Palazzolo <joe@joepalazzolo.net>
* Misc fixes on the pt-BR translation
* Fix the pt-BR translation of "Wipe Tower"
* Fix the pt-br translation of "ooze"
* Fix pt-BR translations of "flip", "roll", "rotate"
* Fix translations of "preset", "profile", "template", "model"
* Fix the pt-br translation of "nozzle"
* Fix the pt-br translation of "overhang"
* Fix the pt-br translation of "threshold"
* Fix the pt-br translation of "scarf joint"
- Fix crash when selected bed type is not supported by current version.
This could happen if you downgrade Orca to old version that does not
have that bed type.
- For example, if you ever run 2.3.0-beta and having current bed type
set to the last one from the drop down, then if you use 2.2 again the
app will crash during startup.
- This PR fix this by falling back to default bed type if current value
is out of range.
- This PR also fixes issue that current bed type is changed after
upgrading to 2.3 from previous version, due to adding the supertack in
the wrong place in the enum.
and modify the overlap of wall and infill for wipe tower jira:none
cherry picked from commit
bambulab/BambuStudio@4db196b11f
Thanks BambuLab!
- Optimize the starting position of the printing wiper tower after
material change, the initial print on the wipe tower sometimes had
under-extrusion issues, and all layers of wipe tower have the same
starting position, increasing the risk of collision. This optimization
distributes the initial extrusion over four corners, reducing the
accumulation of defects.
- Reducing the rivet length between the wipe tower's outer wall and
infill to 0mm minimizes the risk of collision when switching between
printing infill and outer walls.

# Description
Fixed two regressions:
1. Total layer number was missing for BBL printers
2. M73 remaining info was wrong when ARC fitting is enabled.
# Screenshots/Recordings/Graphs
<!--
> Please attach relevant screenshots to showcase the UI changes.
> Please attach images that can help explain the changes.
-->
## Tests
<!--
> Please describe the tests that you have conducted to verify the
changes made in this PR.
-->
* Added Elegoolink connection
* Set Elegoo CC default bed to btPTE
* Friendly output of some error codes of PrintHost
* feat: Add elegoo centauri carbon profile
* fix: Fix the issue where the bed type in the printer configuration does not match the bed temperature settings when multiple bed types are not supported.
* feat: Modify the elegoo process parameters to disable slowdown_for_curled_perimeters.
* feat: Update comment to clarify plate visibility for multi bed support, BBL printer, and selected bed type.
* fix: Optimize ElegooLink upload; The code is clearer than before.
* feat: Format the ElegooPrintHostSendDialog code.
* fix: Remove the unnecessary instantiation attribute in the Elegoo process.
* fix: Flatpak compilation failed
---------
Co-authored-by: anjis <anjis.zhou@elegoo.com>
* Comprehensive Update in Traditional Chinese
* Update OrcaSlicer.pot & Update Traditional Chinese
* Update OrcaSlicer_zh_TW.po
* Fix Space
* Update the translation for the new features.
* Correction of full width symbols
* Correction of full width symbols
and modify the overlap of wall and infill for wipe tower
jira:none
Change-Id: I0d1355c718e2bd1efea6d898f793f5869476ab12
(cherry picked from commit 4db196b11f052d6a7a7c7a8aafe0d2b34a7d2d80)
the maximum diameter is changed to 20;
the diameter will not be reset;
jira:STUDIO-8497
GITHUB: #5048
Change-Id: I131305671ebc00dcf6b2972994879fe4ea768a36
(cherry picked from commit 3e9006e2d47c87da40e627034d0dc71c563e98ae)
Add minimum flow ratios for spiral vase transitsions
Currently when starting the spiral vase the extrusion rate is ramped
from 0 to 100% on the first layer and from 100% to 0% on the last layer.
In some cases it can lead to underextrusion at the beginning and end of
the spiral.
This change adds minimum flow ratio options for the beginning and the end
of the vase. This means that instead of ramping from 0% to 100% it
instead ramps from for example 20% to 100%.
This issue has been reported in SuperSlicer
https://github.com/supermerill/SuperSlicer/issues/4195
jira:[STUDIO-6649]
If the model comes from model mall, the name from the mall will be used when sending and printing. When there are special characters in the name, it will cause the sending to fail.
Change-Id: I324441cc7177e7062b79280c5d23afe9eeb5e4c2
(cherry picked from commit 1bcf30c39c648763952703c9060573baa2782f87)
Co-authored-by: tao wang <tao.wang@bambulab.com>
* Additional control over bridges
* Label updates
* Detect and handle layers over external bridges
* Label updates
* To-Do placeholders
* Filter out small external bridges
* Apply safety offset for internal bridge polygon intersections
* code comments
* Increase bridge offsets to 3 perimeters total (1.5 perimeter in each dimension)
* Filter out bridges based on perimeter counts to focus bridge on areas where bridge infill is actually generated in the end.
* Fixing bugs
* Convert tick boxes to drop down menu
* Additional geometry checks for second internal bridge to ensure no small polygons are left over.
* Minor code refactor for clarity
* Further refinements in polygon logic
* Polygon logic refinements pt3
* Further union operations to ensure clean geometry
* Fix compile error
* Clean up constructors
* Only create bridges on stInternalSolid areas, not sparse infill.
* Refactor internal second bridge logic to stand alone parallel for loop to avoid thread deadlocks
* Revert change to only consider stInternalSolid areas for second internal bridge layer.
This resulted in partly unsupported solid infill areas above as the remainder was too narrow to generate sparse infill
* Updated beta statements and tooltip changes
---------
Co-authored-by: SoftFever <softfeverever@gmail.com>
Make the "Open in Orca Slicer" button on Thingiverse work by informing
the system that Orca Slicer is the application to handle URLs with the
orcaslicer scheme.
This fixes this error message visible in Firefox' console when clicking
the button on the website:
Prevented navigation to “orcaslicer://open?file=https%3A%2F%2Fwww.thingiverse.com%2Fdownload%3A14134689” due to an unknown protocol.
See https://github.com/bambulab/BambuStudio/commit/62006bba30f39
PROBLEM
• Current color palette has many repeating or very similar colors
• Colors looks came from 80s and all raw colors like rgb(0,255,255)
• Black and White colors shows less details on surfaces due to shadows
and highlights
SOLUTION
• Picked more specific color tones. Tried to make every alternative to
easily identifiable
• Didnt used black, white or gray
QUESTIONABLE
• New colors follows given order and i used orca color as first. Maybe
orange one is better pick
• I can add, remove, or change order of colors
COMPARISON
before

after

old color set

new color set

as text if you want to experiment
`
wxColour("#00C1AE"),
wxColour("#F4E2C1"),
wxColour("#ED1C24"),
wxColour("#00FF7F"),
wxColour("#F26722"),
wxColour("#FFEB31"),
wxColour("#7841CE"),
wxColour("#115877"),
wxColour("#ED1E79"),
wxColour("#2EBDEF"),
wxColour("#345B2F"),
wxColour("#800080"),
wxColour("#FA8173"),
wxColour("#800000"),
wxColour("#F7B763"),
wxColour("#A4C41E"),
`
/run/build/BambuStudio/src/libslic3r/Support/SupportParameters.hpp: In constructor ‘Slic3r::SupportParameters::SupportParameters(const Slic3r::PrintObject&)’:
/run/build/BambuStudio/src/libslic3r/Support/SupportParameters.hpp:172:39: error: ‘warning’ was not declared in this scope
172 | BOOST_LOG_TRIVIAL(warning) << "tree support default to organic support";
| ^~~~~~~
/run/build/BambuStudio/src/libslic3r/Support/SupportParameters.hpp:172:21: error: ‘BOOST_LOG_TRIVIAL’ was not declared in this scope
172 | BOOST_LOG_TRIVIAL(warning) << "tree support default to organic support";
| ^~~~~~~~~~~~~~~~~
/run/build/BambuStudio/src/libslic3r/Support/SupportParameters.hpp:175:39: error: ‘warning’ was not declared in this scope
175 | BOOST_LOG_TRIVIAL(warning) << "tree support default to hybrid tree due to adaptive layer height";
| ^~~~~~~
/run/build/BambuStudio/src/libslic3r/Support/SupportParameters.hpp:175:21: error: ‘BOOST_LOG_TRIVIAL’ was not declared in this scope
175 | BOOST_LOG_TRIVIAL(warning) << "tree support default to hybrid tree due to adaptive layer height";
| ^~~~~~~~~~~~~~~~~
(cherry picked from commit a63070bd4cbe012315b9532f5c199f6d2664333a)
1. fix the issue that setting top z distance=0 not working
2. remove too small extrusions of tree support
jira: STUDIO-8578
Change-Id: I8c3face9d6a756698a6fab876fdb1acc0686647c
(cherry picked from commit 4d219266a1f520445bec6ac5a0274dcfec4050e8)
1. speedup organic tree support by using parallel for intersection of bed area
jira: STUDIO-8451
2. add extra wall for hybrid tree support's tall branches
3. disable circle fitting for tree support. This feature produces inconsistent
circles for tree supports.
4. expose the option tree_support_branch_diameter_angle. Tree supports'
strength can be improved by increasing this value.
Change-Id: If3688ca895df98a77f6ca538077daf8fe94e53f1
(cherry picked from commit 7697eb3dc8f87204d28e6be9adaf55dfcdadbc74)
The expansion was too large and may miss sharp tails near the object.
jira: STUDIO-8400
Change-Id: Iee5bd15cc7c23f16d30365d5f1c9fbcc0a632c19
(cherry picked from commit 05174d07063d8296241de1d35f5b4196bc33a353)
1. fix hybrid tree support may go outside plate
github: #4769
2. fix false alarm of empty layer warning
jira: STUDIO-8178
Change-Id: I7bcc3959b06184901cbec946e8840c7a94bc1cab
(cherry picked from commit 647bd4213c363eff6258992f5f607c1f03cbc482)
Change the behavior of "tree support wall count" option, let it control precisely.
0 means auto.
jira: STUDIO-8068
github: 4780
Change-Id: I6d1a64cff9b121f5c0a3e910c5ddbfe6db198687
(cherry picked from commit a557bbe758cd352fa9bb48323995ed2c90737577)
1. keep all polygon nodes in drop_nodes
2. prevent generating too small polygon nodes
jira: STUDIO-8107
Change-Id: I1311158ab15097eb10727a8d6884b0bcd8136ef1
(cherry picked from commit 038b92a536a56568b1c6f385ce19ff36331cd46a)
this function crashes if there are empty elements in entities.
jira: STUDIO-7975
Change-Id: I0dbeb6b1151dd089be7617ebc3271691f64ac61e
(cherry picked from commit df30728617a89891c68e36cce771fb6380355b82)
(cherry picked from commit e42aabebb16253b0172fb80a58f58953aec8dda7)
Previously painting support enforces on vertical faces doesn't work, as projecting the facets downwards will give empty polygons.
Now we use a different mechanism to enable vertical paint-on enforces, by directly adding contact nodes.
Note: this feature only works with tree support as only tree support has contact nodes.
jira: none
Change-Id: Id171b1665566d142a6427285baccb40c0aa00949
(cherry picked from commit 9c882f61eb37350a4486df58de48f0ae489f2d15)
(cherry picked from commit 68625a6e601e2feef8e56693da1f58372b27b560)
1. do not add interface for small overhangs so supports are easier to
remove
2. calculate avoidance more accurately using real layer height
jira: STUDIO-6285
3. hybrid nodes won't collide with lower layers
4. calculate max move more accurately
5. do not increase radius if next layer has collision
jira: STUDIO-2296, STUDIO-7883
6. rewrite plan_layer_heights to prevent support layers overlap.
Now the tree support layers are completely independent to object layers.
6. increase collision areas for interface. The top layers may be too
close to interface with adaptive layer heights and very small overhang angle
Change-Id: I052c3f66e68afb7663e2d70c846dd09ed7086071
(cherry picked from commit aca511caebfdeec270d4fc0ec6bbbadde77cddc9)
(cherry picked from commit f2fc996652b3b204b4e554f57afed8519feb0397)
1. add rectilinear interface pattern for organic support
jira: STUDIO-7181
2. add tree support optgroup
Change-Id: I94882bc34a61c6adc06b8ecbc9f2323f9b039aac
(cherry picked from commit a8142ab3f37e0bd140a31a7e635b8475f471d7e3)
(cherry picked from commit 69cf816b9431bc21ca0187c7db1148e2d2e898ab)
To fix this we have to expand the enforcer areas just like organic support.
jira: STUDIO-7538
Change-Id: I8e4e3fd18b0e77db9beb57347d8da895fc83f4b0
(cherry picked from commit 319b3e2247e01e545bb9e4cebea7950d875cd89a)
The top z gap should be split if it's too large.
Also we use same logic for both synced and independent support layer.
jira: STUDIO-7232
github: #4191
Change-Id: Idca792e8fa51a83c2a09441ecac64d40b91d6390
(cherry picked from commit c262a7ea137db09e453c157115b3d5417a32886d)
The raft gap layer should only exist if there are raft layers.
jira: STUDIO-7184
Change-Id: Ia4d2a5b7ddf873fb4ef16c7087648214e6bde806
(cherry picked from commit f13144d6a9c20cfbad11c6907c30b10447d8f8a3)
This bug causes supports difficult to remove.
Rule to remmeber:
never decrease the top z distance, you can only increase it SLIGHTLY.
jira: STUDIO-7103, STUDIO-7001
Change-Id: I24f71cd67d182d4e2c0902f244a8ca8f4c3ee982
(cherry picked from commit 461af9e8f6f98a8e0b363436276f225183365998)
also change default style to tree organic
jira: STUDIO-6801
Change-Id: Iab1d8c6117139c9a7a4c1fa71de0a13bcb356dd5
(cherry picked from commit d2c4efad58f16b23bef49bd47d3b70bf322d6f55)
(cherry picked from commit cd9305e3e061b67903ed8f5cd05d0136d608ee01)
Previous parallelization has a bug where two adjacent nodes may be deleted at the same time.
jira: none
Change-Id: I99a29dae9f72aa74ed2721eea4421b15eec10732
(cherry picked from commit 91efe67d723652d3f7e4484dd3cdf31638f769a4)
(cherry picked from commit 734a70b493b0347870dc955021b0f7055c76f84b)
1. sharp tails are supported by a sparse set of contact points which are
easier to remove than previously dense surrounding support.
Organic tree support also has this feature, including all other smart
overhang detection techniques (small overhang and cantilever detection),
with the cost of slightly longer time to detect overhangs.
2. improve supporting overhang contours by adding contact points along
contours.
jira: STUDIO-3876
2. remove some redundant data structure.
Change-Id: If7f595348506a14aba2d0132d23f97d3539c1e1f
(cherry picked from commit e3cce09b9db12ced2841045ffd337b1f35494e6c)
(cherry picked from commit 507345deb193d895d0813fc913f00b0def7e62f9)
1. speedup detect_overhangs by skipping sharp tail and cantilever detection if there are too many overhangs.
jira: STUDIO-3584, STUDIO-2592
2. drop_nodes with precalculation of avoidance and tbb parallel_for_each for all nodes in each layer.
jira: STUDIO-1814, STUDIO-2381, STUDIO-2639, STUDIO-5020,
3. don't show too many progress messages
Change-Id: Ia4897089c69c235fb7cd8e5fdcf4690086048b31
(cherry picked from commit 9c08e28b5b5342dfdde2c939fc953f143a42a59b)
(cherry picked from commit 9de69035a029374be477b74e67c96dd8235daafa)
1. reduce unnecessary small parts of tree supports
jira: STUDIO-6506
2. fix the bug that zero height tree support may be generated with synced support layer height.
3. fix the bug that tree nodes' radii may change abruptly
jira: STUDIO-6326
Change-Id: I38153d136e46bf9d797881cc6ca8803767f46736
(cherry picked from commit 59af0a6c2643169463cf18010ffd75f3aa19b704)
(cherry picked from commit 47440f040cae70f79e430b02d44f6093208ac066)
1. raft under organic trees are not generated
2. Studio may crash when generating organic supports for some objects.
jira: STUDIO-6407
Change-Id: I6e7ff2423b9fee95e4a4a85ccc2844549142f0c8
(cherry picked from commit 00db6c241270f5524bf1618109a2b45872073fd0)
(cherry picked from commit c7d12b703e23a83840f480e2cbb3a80fb00e059d)
1. reduce the gap between blade-shape overhang and support
github: #3667
2. improve sharp tail detection of blade-shape overhangs by introducing
lslices_extrudable.
github: #2786, #3367
jira: STUDIO-5065, STUDIO-6038
Change-Id: I4e899eace1aa28b100a6f4ce2b8d740c317f5530
(cherry picked from commit 08328b848e39c345b6c7b64021d1e0f04df24d08)
(cherry picked from commit 22056d5f7e7bef5574b53fc0453781cd365bf0e1)
1. Raft was not generated when tree support is selected but enable_support is false.
2. Raft angle and density of tree support was incorrect
github: #3675
Change-Id: Ifd78bf619a28eb03a908e75ad56af4934b6b08b7
(cherry picked from commit 2a448095a2fb4a2abebb0a5c8082a2ddbb635f16)
(cherry picked from commit e7ffe31cb3c6b526268adb4c2349a2623b181c53)
Only early stop detect_overhangs if support is disabled AND not checking support necessity.
jira: STUDIO-6158
Change-Id: I2d9662231d941827d6392d57344f7d911f641e09
(cherry picked from commit b811a6031d1afe0e7b1cb73050fe6391a65411ef)
(cherry picked from commit fa61ee6abdb4b04a2141b3f8ea9e2e8a789b7881)
1. accurate top z distance for tree support
Also fix a bug that bottom z and top z distances are misused.
jira: STUDIO-3000, STUDIO-5990
github: #1827
2. Change interface pattern to interlaced rectilinear when using
support material.
2. clean up tree support code
Change-Id: Icc8ce1b6844c841a6fbd1d623df707fdc8ed0f7b
(cherry picked from commit da7412a48dfb5767918ef125b9d0fb9718c03a61)
(cherry picked from commit 39ae64fc53abec794d740e36baaa13fd6fb35849)
The bottom interface layers were not right when "independent support layer height" is enabled.
This commit ensures there are always 2 bottom interface layers and the gap
is not less than specified. However, the gap may be slightly larger.
Jira: STUDIO-3842, STUDIO-2138
Github: #2127
Change-Id: Ifd8fbc4c7bc6dd92f2534fdd0179458a9e93c79a
(cherry picked from commit edcdad162e)
For tree support, use lslices as tree support island when generating brim,
as this is faster and more accurate.
For normal support, still use "support_fills.polygons_covered_by_spacing()" as support island when generating brim;
Jira: studio 4332
Change-Id: Ibfadd3a166606f824e5780b57112fff221470aaf
(cherry picked from commit 64960b19818c7029eaaaf3d8a89804aeaa26f11d)
(cherry picked from commit 181b05c236)
1. interlaced rectilinear interface pattern not working with tree supports
2. infill overlaps with walls when wall count>1
3. support blockers can't block sharp tail detection in normal support
jira: STUDIO-5663
4. bottom z distance=0 not working for normal support.
jira: STUDIO-5676
github: #3203
Change-Id: I025eff2aaad90ad565661aa656c59c82ff969bbf
(cherry picked from commit 5aaf7ead0fd697043f673161e0ede0145ec49f4d)
(cherry picked from commit f3bd5ff87021b5c26794751a1f1da4349b603102)
There is no raft generated when only raft enabled but no support needed.
jira: none
Change-Id: Ic0c9269e2f98038d85c9bc54e4a85f892dc5d764
(cherry picked from commit 1106ff8253)
We must ensure when independent support layer height is enabled, the
support layers are strictly synced with object layers. Otherwise, the
wipe tower toolchange may be messed up.
Jira: STUDIO-4097
Change-Id: I6208653f9665b15d028940d5e130c9e895629fc2
(cherry picked from commit 41d35c8af152c91cb356a68d88a879a115b44778)
(cherry picked from commit 2b593ce378)
1. open support wall count for normal support
Enabling this option makes normal support stronger and gives
better overhang quality, but also more difficult to removal.
Jira: STUDIO-5192
2. fix a bug where tree support (hybrid style) may get overlapped
extrusions near the walls.
3. fix a bug where raft layers can't be 1 in tree support
Jira: STUDIO-5261
Change-Id: Iadc0c67a9b50b5b221c8e83d5aa22ed282018cf8
(cherry picked from commit c0bb0084e386cb70ed6e16edf93190e4b38f5b90)
(cherry picked from commit bf93fd02fb)
First layer support can't be top interface, and
min brim width of auto mode should be larger
than 0.
Jira: STUDIO-5010
Change-Id: I02f8b017b535f8a47965387e8679f692b1966e04
(cherry picked from commit 3e7d54abe352e8ab5f9d6492b5a86a96f9067f94)
(cherry picked from commit 7efebe6bc6)
We decide to set brim width of all objects to MAX_BRANCH_RADIUS_FIRST_LAYER if there is an object with tree support after discussion.
Jira: MAK-2009
Change-Id: I4c4940800632c433235966b01c44ac910e33a51c
(cherry picked from commit bambulab/BambuStudio@2bd6b11505)
Co-authored-by: Arthur <arthur.tang@bambulab.com>
1. Improve generation speed by removing unnecessary get_avoidance.
2. Fix a bug of hybrid support's interface (Jira: STUDIO-4878,
STUDIO-4726, Github#2614)
3. Fix a bug of tree support pass through objects (Jira: STUDIO-4252, STUDIO-4608
STUDIO-4298)
4. Fix a bug with first layer + Arachne (Jira: STUDIO-4281, Github #2423)
Change-Id: I40978c93ab93fa6964483514dad552d73a66c710
(cherry picked from commit 2ccbbe49c74d4aab4f086e79a6f8262b7fc80f15)
(cherry picked from commit bambulab/BambuStudio@d7a4623380)
Co-authored-by: Arthur <arthur.tang@bambulab.com>
1. add a hook inside tree branches for improved strength
2. fix the issue that interface may fly as a mess (delete the logic
where gap nodes can skip dropping down)
3. fix the issue that base nodes may fly as a mess (smoothing should
skip polygon nodes, see Jira:STUDIO-4403)
Change-Id: Ie9f2039813c2ca3127ed8913304cc455fec8e7ee
(cherry picked from commit 83cef5f91d49ff3d275a89ec3df8b5f0fd573f8c)
(cherry picked from commit bambulab/BambuStudio@76f876a3c6)
Co-authored-by: Arthur <arthur.tang@bambulab.com>
* Whitespace cleanup in Prusa profile
```
$ diff -u Prusa.json <(jq --indent 4 < Prusa.json) | wc -l
0
```
* Add Prusa MK4S profiles
There were generated from the PrusaSlicer profiles[0] using some scripts
which try to faithfully convert the profiles[1]. The high flow nozzle
settings have been modeled as a separate printer model.
A few things I'm aware of that haven't been converted:
- Filament multi-material settings (eg loading speeds)
- High-flow and abrasive nozzle check in gcode, which, as far as I
know, isn't available in the current firmware anyways
I've also found that disabling z-hop on layer change in OrcaSlicer seems
more similar to the behavior in PrusaSlicer (which allows travel
distance limitations to override that setting), so I've disabled that.
Fixes#7391
[0]: 0bca90da13/resources/profiles/PrusaResearch.ini
[1]: https://github.com/rcloran/SuperSlicer_to_Orca_scripts/tree/20d2881
**The latest download link can be found from the "Checks" tab above or
[here](https://github.com/SoftFever/OrcaSlicer/pull/8256/checks). There
should be an "artifact" dropdown on top of that page once the build is
completed.**
This PR solves the following problems:
- Bind printers in different subnet
- Binded LAN printers are not automatically connected when switching to
Device tab


Few improtant things to know:
The automatic printer info detection (ie, the step in the first image)
doesn't work on MacOS, when you click "Connect" you will immediately be
prompted to the second image to enter the printer details. (I don't know
why but Bambu does not provide this capability on MacOS for their
network plugin)
AFAIK, P1 series do not support automatic printer info detection (as
tested by @SoftFever and myself), so the first step is gauranteed to
fail, which is unfortunate but expected. Simply click the "Manual Setup"
button (which will appear after clicking the "Connect" button then wait
for a while) and enter the printer detail and you should be good to go.
If anything entered wrong, you could simply unbind the printer and do it
all over again.
I know current binding flow is not very user-friendly, but consider how
rare this will be used, I think it's OK. Given the current situation
this is the best I could do with the closed-source Bambu network plugin.
I only have a P1 so I couldn't throughly test this PR. Please if you
have different printers and home network configurations, your feedback
are valuable to help validating and improving this PR, thanks in
advance!
Fix#6169Fix#8097
Calculate toolbar icon size the same way as it done on windows:
manipulate icon size, not toolbar scale.
Scaling icons this way makes images sharper since they getting
rasterized to a target size rather than being rasterized for 40px and
scaled to a desired size later.
Addresses #8275 by adding time lapse gcode
The profile was missing the time lapse gcode. I ported the time lapse gcode from Qidi Studio's layer change for this profile.
Co-authored-by: Noisyfox <timemanager.rick@gmail.com>
addresses #8093 by using proper placeholder
The original setting was using `hot_plate_temp_initial_layer` which doesn't respect the various build plate temperatures. `bed_temperature_initial_layer_single` does.
Co-authored-by: Noisyfox <timemanager.rick@gmail.com>
* glcanvas: add modifiers to mouse events logging
* glcanvas: workaround for touchpad nav on Win
Releasing ALT on windows platform result in GLCanvas losing focus.
Because of this mouse movements not being processed by on_mouse() event
handler and camera rotation have not cleaned up.
Make a workaround for Windows to cleanup camera rotate state on
releasing ALT modifier.
The following Bambu filaments have been added:
- Bambu PLA Wood
- Bambu PLA Silk+
- Bambu PC FR
- Bambu PETG Translucent
Additional variants for the above filaments have also been added, including versions for different nozzles and printers.
The filament vendor for Fiberon PA612-CF has been corrected from "Bambu Lab" to "Polymaker."
This PR ported the following changes based on BBS 1.10.1 codebase:
- The ability of binding printers via IP (Fix#8099)
- The ability of setting AMS filaments during print (Fix#7882)
- Some other related fixes and improvements
Thanks BambuLab for those improvements!
~~Please note: with this update, we will no longer be able to streaming
the live camera through cloud, only through Lan (even if the printer is
not in Lan mode). At least that's what I saw with this PR and also
#8103, more tests & feedbacks on this are needed.~~ Update: nvm, I
missed a commit that fixes the remote live view. It's working now.
Unfortunately even with this update you still cannot bind the printer in
a different subnet, which is an inherent problem from BBS:
https://github.com/bambulab/BambuStudio/issues/4512
https://github.com/bambulab/BambuStudio/issues/5070
https://github.com/bambulab/BambuStudio/issues/5833
and more...
* Add support for perlin noise fuzzy skin
* Support multiple types of coherent noise
* Updated tooltips for more clarity.
* Reorder options as suggested by @discip
* Fix accidental removal of &
* Move libnoise to deps
---------
Co-authored-by: SoftFever <softfeverever@gmail.com>
* Gcode Statistics Panel - Persist open/close state
Bug: On slicing a model, the Statistics Panel would be reset to being open (regardless of if the user had shut it earlier)
Fix: Now on app open the Statistics Panel will be open, but if the user closes it, its state will persist (regardless of slicing again)
https://github.com/SoftFever/OrcaSlicer/discussions/6021
* Gcode Statistics Panel - fold/unfold button width fix
Issue: The fold/unfold button width is too wide (It seems CalcTextSize is making the button wider than necessary)
Fix: Set the width to a correct fixed value
* Update Anycubic Kobra 0.4 nozzle.json
Fix incorrect parameters for M204 in start gcode
* Update Anycubic Kobra end_gcode and travel speeds
* Update Anycubic i3 Mega S start and end gcode
* FIX:update custom_texture when new_shape=false
Jira: STUDIO-5287
Change-Id: I3add95f9f9345c14a48cc7467513d1b3ce95f4c9
(cherry picked from commit 9ce7de10f4)
* FIX: correct the bed model to the print area origin point
Change-Id: Ieb856dff421d39694966e3c13c519f4ffa3da5c2
(cherry picked from commit 32892514ff)
* Avoid unnecessary copy of `position` parameter
* Merge branch 'main' into bugfox/plater-y
* flatpak: install translations in flatpak
Note: you also need to update flatpak config to add desired locales to
flatpak environment via `flatpak config --set languages='en;ru'; flatpak update`
or `flatpak --user config --set languages='en;ru'; flatpak --user update`
* flatpak: mesa-20.x tarball has been moved, fix the url
It's now under older-versions/20.x directory
# Description
1. Implement a centralized Orca filament library. Previously, OrcaSlicer
required that filament profiles be contained within a printer vendor's
profiles, making it impractical to add printer-vendor-independent
filament profiles. With this new implementation, Orca now supports a
centralized filament library, accommodating all filament vendors for any
printer, or offering specialized versions for specific printer models.

2. Support the reuse of filaments across various vendors and machines
Users can now share any personal filament and print configurations
across all printers.
https://github.com/user-attachments/assets/5c324d07-7bbf-4913-8abf-2506a255759f
<!--
> Please provide a summary of the changes made in this PR. Include
details such as:
> * What issue does this PR address or fix?
> * What new features or enhancements does this PR introduce?
> * Are there any breaking changes or dependencies that need to be
considered?
-->
# Screenshots/Recordings/Graphs
<!--
> Please attach relevant screenshots to showcase the UI changes.
> Please attach images that can help explain the changes.
-->
## Tests
<!--
> Please describe the tests that you have conducted to verify the
changes made in this PR.
-->
* Initial DM2 Profiles
Add profiles for DeltaMaker 3D printers
* Made changes to machine/fdm_machine_common.json and process/fdm_process_common.json to validate successfully using the Orca profile validator
* Update DeltaMaker 2.json
Corrected the capitalization of the file name.
---------
Co-authored-by: Noisyfox <timemanager.rick@gmail.com>
Co-authored-by: SoftFever <softfeverever@gmail.com>
Co-authored-by: Christian Coleman <christianlanecoleman@gmail.com>
Fix issue `Preset name "0.20mm Speed @MK3S 0.4" was marked as renamed from "0.20mm Standard @MK3S", though preset name "0.20mm Detail @MK3S 0.6" was marked as renamed from "0.20mm Standard @MK3S" as well.`
During the printer connection cycle, each Filament and slot is only judged once
When deleting custom filaments or modifying the temperature of custom filaments, re evaluate
Jira: XXXX
Change-Id: If495a343efdb1be6f46d11dd20f6ec7934266e87
(cherry picked from commit e5dab1487188d744c732568232b32666e5f2cc5c)
only use the same path as binary for current path
JIRA: STUDIO-7875
Change-Id: I5523e3b7e20b0f24de50c8d295f54b984693165a
(cherry picked from commit 62b98f783dcee8900da034b384167817155a3e59)
JIRA: STUDIO-7534
Change-Id: I0b5d3764ebf61735238207adc2053ad45ce5ec1a
Signed-off-by: Stone Li <stone.li@bambulab.com>
(cherry picked from commit babda59caa2cb83ae993bfe87c865d7f61c6ab4b)
(cherry picked from commit ff22a8651580a637e42a6839ae364552354781e1)
JIRA: STUDIO-5195
Change-Id: Ida3cd5c60b25d1eff4f04e324a74d63394a9ffeb
Signed-off-by: Stone Li <stone.li@bambulab.com>
(cherry picked from commit 6b6787b30736f87491171237a36c6badc8e51878)
(cherry picked from commit acfdcadac09f05f2e008340d485c4781744c95f9)
A trivial amendment to the initial graphics location to correct it from that of another fork, plus some trivial text edits to smooth reading.
Added a small text to encourage others to report spammy sites to the engines to have them eventually culled.
* Update build_deps.yml
Fixes "Build on Windows" so an error isn't thrown if the working directories already exist.
* Update build_deps.yml
* Update build_deps.yml
Compare the custom gcode z to `0.5*(layer_z[n] + layer_z[n+1])` instead of `EPSILON`
to compensate float rounding error during gcode processing (SoftFever/OrcaSlicer#7834)
* Fix style preview size per resolution
(cherry picked from commit b67c4785f0d300b5615126ea1df1d518dd6d00b0)
* Align font preview to left. (closer to font name)
(cherry picked from commit eb9b8c0c2b112f0f7649e58f4f6d7977380b8442)
---------
Co-authored-by: Filip Sykala - NTB T15p <Filip.Sykala@Prusa3D.cz>
Field: SpinCtrl: Removed code that was relevant for wxSpinCtrl, but not for the new SpinCtrl.
(fix for SPE-2050)
(cherry picked from commit 555193f6ec477d4107f8998c7a3c441cde72382c)
Co-authored-by: YuSanka <yusanka@gmail.com>
* Make sure the `m_extrusion_quality_estimator.set_current_object()` is called after regional config has been applied (SoftFever/OrcaSlicer#7946)
* Init `m_extrusion_quality_estimator` based on region config
* Revert "Make sure the `m_extrusion_quality_estimator.set_current_object()` is called after regional config has been applied (SoftFever/OrcaSlicer#7946)"
This reverts commit d13d4a47b7.
* Call `m_extrusion_quality_estimator.set_current_object` regardless, because that doesn't hurt
* Add a comment
* Revert "SPE-1950: Optimization of computation complexity of perimeter ordering for Arachne generator."
This reverts commit 47ec9b9b06.
* Revert "SPE-1963: Improve ordering of perimeters with Arachne perimeter generator"
This reverts commit babb84c70a.
Fix issue that the contact layer is printed in wrong filament when interface layer number is set to 0
Cherry-picked from prusa3d/PrusaSlicer@ca5f6da08d
Co-authored-by: Vojtech Bubnik <bubnikv@gmail.com>
Some portions of GCode (like BTT_TFT thumbnails) has to be CRLF in
order to work correctly. However, gcode post processor was ignoring
input line endings style emitting '\n' (LF) into post-processed output.
* enabled dependency setting for filament and process
* Add information about inheritance back to Dependencies tab
* Merge pull request #1 from michmela44/Add_inherits_to_dependencies
Add information about inheritance back to Dependencies tab
* Merge branch 'main' into feature/enable_profile_dependencies
* Update OrcaSlicer.pot
Made sentence a bit clearer.
* Update PrintConfig.cpp
Made sentence a bit clearer.
* Update OrcaSlicer.pot
corrected previous expression
* Update PrintConfig.cpp
corrected previous expression
* fix: tray_exist_bits != tray_exist_bits comparison
* fix: title == GetTitle() == title comparison
* fix: possibly dangling reference to a temporary
```
OrcaSlicer/src/libslic3r/calib.cpp:456:17: warning: possibly dangling reference to a temporary [-Wdangling-reference]
456 | const auto &w = bed_ext.size().x();
OrcaSlicer/src/libslic3r/calib.cpp:456:45: note: the temporary was destroyed at the end of the full expression ‘((Eigen::DenseCoeffsBase<Eigen::Matrix<double, 2, 1, 2>, 1>*)(& Slic3r::BoundingBoxBase<PointClass>::size() const [with PointClass = Eigen::Matrix<double, 2, 1, 2>]()))->Eigen::DenseCoeffsBase<Eigen::Matrix<double, 2, 1, 2>, 1>::x()’
456 | const auto &w = bed_ext.size().x();
```
* fix: mixup of | and ||
in this case I think it actually does not change the semantics it just means that both comparison have to be evaluated.
* fix: multi-character character constants need "
OrcaSlicer/src/slic3r/GUI/MediaPlayCtrl.cpp:392: warning: multi-character character constant [-Wmultichar]
392 | if (auto n = tunnel.find_first_of('/_'); n != std::string::npos)
OrcaSlicer/src/slic3r/GUI/MediaPlayCtrl.cpp: In member function ‘void Slic3r::GUI::MediaPlayCtrl::Stop(const wxString&)’:
OrcaSlicer/src/slic3r/GUI/MediaPlayCtrl.cpp:392: warning: overflow in conversion from ‘int’ to ‘char’ changes value from ‘12127’ to ‘95’ [-Woverflow]
* fix: missing paranthesis - skips null check
* NFC: Remove this check it can never be false
* NFC: fix warning: statement has no effect
* Update 0.25mm Quality Speed @RatRig V-Core 4 HYBRID 0.4.json
it's HYBRID not HYBIRD
* Update 0.25mm Quality Speed @RatRig V-Core 4 HYBRID 0.5.json
it's HYBRID not HYBIRD
* Update 0.25mm Quality Speed @RatRig V-Core 4 HYBRID 0.6.json
it's HYBRID not HYBIRD
* Add files via upload
Adding process files for the 0.8 nozzle
* Add files via upload
machine profiles for 0.8 nozzle
* Update Ratrig.json
Added support for 0.8.nozle
* Add files via upload
Added filament profile for the more and more popular PCTG
* Update Ratrig.json
Add filament PCTG
* Update Ratrig.json
Filament setting for big (>0.4) nozzles
* Add files via upload
Filament setting for big (>0.4) nozzles
* Filament setting for big (>0.4) nozzles
Filament setting for big (>0.4) nozzles
* Optimized layer and extrusion values
Optimized layer and extrusion values
* New set of profiles for RatRig V-Core 4 - 400 IDEX
New developed set of profiles for RatRig V-Core 4 - 400 IDEX with virtual copy and mirror printers (with appropriate smaller build plates and idex commands)
* New set of profiles for RatRig V-Core 4 - 400 IDEX
New developed set of profiles for RatRig V-Core 4 - 400 IDEX with virtual copy and mirror printers (with appropriate smaller build plates and idex commands)
* New set of profiles for RatRig V-Core 4 - 400 IDEX
New developed set of profiles for RatRig V-Core 4 - 400 IDEX with virtual copy and mirror printers (with appropriate smaller build plates and idex commands)
* Profiles V-Core4 IDEX 300 + 500
Added profiles for Ratrig V-Core4 IDEX bedsize 300 and 500
* Profiles V-Core4 IDEX 300 + 500
Added profiles for Ratrig V-Core4 IDEX bedsize 300 and 500
* Complete profile sets for V-Core 4 - IDEX
Now the profile sets for V-Core 4 IDEX - size 300+400+500, all with copy and mirror mode, are completed.
(profiles are tested in real prints for V-Core 4 IDEX 400 including copy and mirror, 300+500 only calculated)
* Complete profile sets for V-Core 4 - IDEX
Now the profile sets for V-Core 4 IDEX - size 300+400+500, all with copy and mirror mode, are completed.
(profiles are tested in real prints for V-Core 4 IDEX 400 including copy and mirror, 300+500 only calculated)
* Updated Filament for large nozzles (>=0.6)
Added missing TPU for big nozzles
---------
Co-authored-by: SoftFever <softfeverever@gmail.com>
* Fix start gcode setting bed temp to nozzle temp for Raise3D Pro3 Plus left nozzle
Edited Raise3D Pro3 Plus 0.4 nozzle (Left).json
Replaced S{nozzle_temperature_initial_layer[0]} with S[bed_temperature_initial_layer_single] for M140 and M190
* Fix start gcode setting bed temp to nozzle temp for Raise3D Pro3 left nozzle
Edited Raise3D Pro3 0.4 nozzle (Left).json
Replaced S{nozzle_temperature_initial_layer[0]} with S[bed_temperature_initial_layer_single] for M140 and M190
* Update Raise3D Pro3 Plus 0.4 nozzle (Left).json
---------
Co-authored-by: SoftFever <softfeverever@gmail.com>
* added change g-code
* adjusted change_filament_gcode for all k2 profiles
* Merge branch 'main' into 7607-k2plus-filament-change-gcode
* Merge branch 'main' into 7607-k2plus-filament-change-gcode
* Merge branch 'main' into 7607-k2plus-filament-change-gcode
* Merge branch 'main' into 7607-k2plus-filament-change-gcode
* Merge branch 'main' into 7607-k2plus-filament-change-gcode
* Merge branch 'main' into 7607-k2plus-filament-change-gcode
* Merge branch 'main' into 7607-k2plus-filament-change-gcode
* removed extra space on new line characters. to exeactly match creality print
* Merge branch 'main' into 7607-k2plus-filament-change-gcode
* Merge branch 'main' into 7607-k2plus-filament-change-gcode
* disabled filamanet ramming and cleared Single Extruder Paramaters
* Merge branch '7607-k2plus-filament-change-gcode' of https://github.com/brandonfhall/OrcaSlicer into 7607-k2plus-filament-change-gcode
* Merge branch 'main' into 7607-k2plus-filament-change-gcode
* Merge branch 'main' into 7607-k2plus-filament-change-gcode
# Description
<!--
> Please provide a summary of the changes made in this PR. Include
details such as:
> * What issue does this PR address or fix?
> * What new features or enhancements does this PR introduce?
> * Are there any breaking changes or dependencies that need to be
considered?
-->
# Screenshots/Recordings/Graphs
<!--
> Please attach relevant screenshots to showcase the UI changes.
> Please attach images that can help explain the changes.
-->
## Tests
<!--
> Please describe the tests that you have conducted to verify the
changes made in this PR.
-->
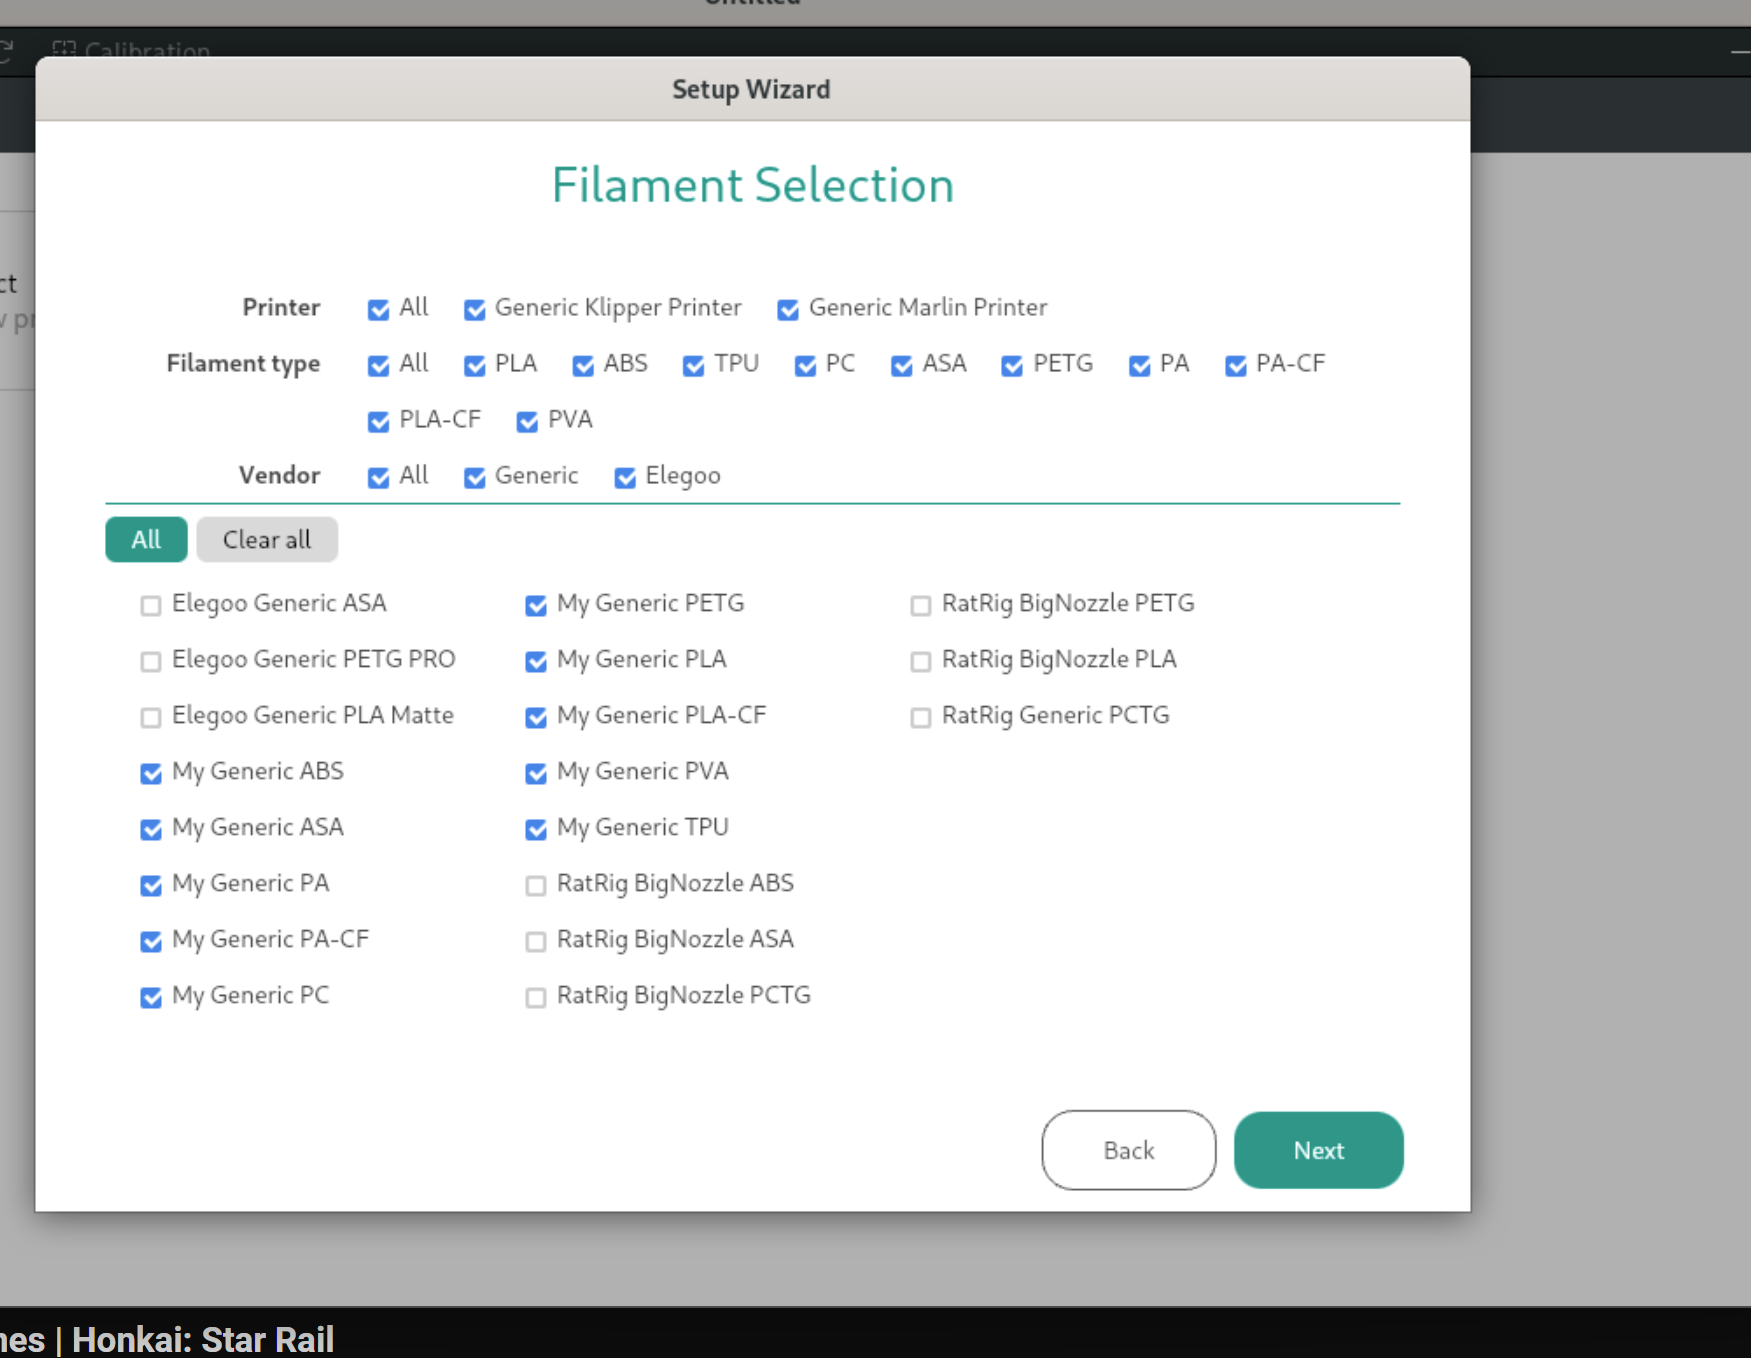
# Description
Filaments that don't have compatible printers defined will invalidate
filter in filament selection UI
This PR:
1. Fix profiles with missing compatible printers attributes
2. Change code logic so that we don't show such filaments
# Screenshots/Recordings/Graphs
## Tests
<!--
> Please describe the tests that you have conducted to verify the
changes made in this PR.
-->
Enhancement: ERS segment length - convert to float
To allow splitting of line segments down to 0.5mm for improved external surface finish.
Co-authored-by: SoftFever <softfeverever@gmail.com>
* Option to limit ERS to external perimeters and overhangs only
* Label name
* Label update
* Merge branch 'main' into Limit-ERS-to-external-perimeters-and-overhangs
* Merge branch 'main' into Limit-ERS-to-external-perimeters-and-overhangs
* Merge branch 'SoftFever:main' into Limit-ERS-to-external-perimeters-and-overhangs
* Merge branch 'SoftFever:main' into Limit-ERS-to-external-perimeters-and-overhangs
* Merge branch 'main' into Limit-ERS-to-external-perimeters-and-overhangs
* Merge branch 'SoftFever:main' into Limit-ERS-to-external-perimeters-and-overhangs
* Merge branch 'main' into Limit-ERS-to-external-perimeters-and-overhangs
* Merge branch 'SoftFever:main' into Limit-ERS-to-external-perimeters-and-overhangs
* Merge branch 'main' into Limit-ERS-to-external-perimeters-and-overhangs
# Description
<!--
> Please provide a summary of the changes made in this PR. Include
details such as:
> * What issue does this PR address or fix?
> * What new features or enhancements does this PR introduce?
> * Are there any breaking changes or dependencies that need to be
considered?
-->
# Screenshots/Recordings/Graphs
<!--
> Please attach relevant screenshots to showcase the UI changes.
> Please attach images that can help explain the changes.
-->
## Tests
<!--
> Please describe the tests that you have conducted to verify the
changes made in this PR.
-->
* SPE-1950: Reimplement algorithm for filtering vibrating extractions inside the ensuring infill to make it less computation complex.
Cherry-picked from prusa3d/PrusaSlicer@b3510ac808
Co-authored-by: Lukáš Hejl <hejl.lukas@gmail.com>
* Remove unused file
---------
Co-authored-by: Lukáš Hejl <hejl.lukas@gmail.com>
* Update DockerBuild.sh
Ensure that the X11 server allows connections from the Docker container.
* Update DockerBuild.sh
Removed fix for X11. Will add to DockerRun.sh
* Update DockerRun.sh
Added help comment to fix and ensure that your X11 server allows connections from the Docker container.
* linxu build with docker in readme
Add build on linux with docker section
* Update README.md
* Update README.md
* Update README.md
remove low ram thing
* Update Dockerfile
---------
Co-authored-by: samthebest699 <106000727+samthebest699@users.noreply.github.com>
Co-authored-by: SoftFever <softfeverever@gmail.com>
The previous implementation during the grouping of perimeters using depth-first searches unnecessarily searched nodes that had no impact on grouping, which significantly increased the search space.
Cherry-picked from prusa3d/PrusaSlicer@86309ba939
Co-authored-by: Lukáš Hejl <hejl.lukas@gmail.com>
Especially in cases when the object is composed only of 2 external perimeters and 1 or 2 internal perimeters, the order of perimeters wasn't optimal and differed from the Classic perimeter generator. That caused unnecessary long travels before the external contour was printed.
The ordering of perimeters is slightly inspired by the latest changes in CuraEngine.
Cherry-picked from prusa3d/PrusaSlicer@10875082de
Co-authored-by: Lukáš Hejl <hejl.lukas@gmail.com>
* Arachne: Fix an arithmetic overflow that causing extra points outside the plate (SoftFever/OrcaSlicer#7321)
* Better way of avoiding overflow, works in Release mode as well
* Fix debug build
* Fix build
# Description
<!--
> Please provide a summary of the changes made in this PR. Include
details such as:
> * What issue does this PR address or fix?
> * What new features or enhancements does this PR introduce?
> * Are there any breaking changes or dependencies that need to be
considered?
-->
# Screenshots/Recordings/Graphs
<!--
> Please attach relevant screenshots to showcase the UI changes.
> Please attach images that can help explain the changes.
-->
## Tests
<!--
> Please describe the tests that you have conducted to verify the
changes made in this PR.
-->
# Description
This PR updates the profiles for BambuLab to the versions shipped in
[01.10.01.50](https://github.com/bambulab/BambuStudio/releases) (which
at time of writing is the latest version).
These includes new profiles for:
- BambuLab ASA-CF
- BambuLab TPU for AMS
- Polymaker Fiberon PA12-CF
- Polymaker Fiberon PA6-CF
- Polymaker Fiberon PA6-GF
- Polymaker Fiberon PA612-CF
- Polymaker Fiberon PET-CF
- Polymaker Fiberon PETG-ESD
- Polymaker Fiberon PETG-rCF
- multiple new generic filaments
And additionally also changes for there Bambu Cool Plate SuperTack
* Update fdm_process_common.json to use slower jerk settings to prevent belt tooth skipping
* Update fdm_process_anker_fast_common.json for faster jerk settings
* Update Max Jerk limit to be in line with real world machine limits
---------
Co-authored-by: Noisyfox <timemanager.rick@gmail.com>
Using my Ender 3 V3 SE I noticed weird printing behaviour. Searching for
the cause, I found that the default layer height for a 0.2mm nozzle for
the printer was set to 0.08mm min and 0.32mm max, which are the default
20%/80% values for a 0.4mm nozzle. This commit changes the values for
all Creality printer which had not a reasonable default value for 0.2mm,
0.6mm and 0.8mm nozzles to 20% min and 80% max.
Co-authored-by: SoftFever <softfeverever@gmail.com>
Accessing a moved object.
Also this method create an unused "out" variable by removing from the parameter.
I guess It should update the parameter object?
Anyway, seems very wrong
(cherry picked from commit 534792e249da3efb83a62279f532b6690d028592)
Co-authored-by: Merill <merill@free.fr>
PrintObject.cpp references tbb::spin_mutex, thus it needs to include
tbb/spin_mutex. Otherwise compilation fails with:
error: ‘spin_mutex’ is not a member of ‘tbb’
Supersedes #7057
* Update 0.25mm Quality Speed @RatRig V-Core 4 HYBRID 0.4.json
it's HYBRID not HYBIRD
* Update 0.25mm Quality Speed @RatRig V-Core 4 HYBRID 0.5.json
it's HYBRID not HYBIRD
* Update 0.25mm Quality Speed @RatRig V-Core 4 HYBRID 0.6.json
it's HYBRID not HYBIRD
* Add files via upload
Adding process files for the 0.8 nozzle
* Add files via upload
machine profiles for 0.8 nozzle
* Update Ratrig.json
Added support for 0.8.nozle
* Add files via upload
Added filament profile for the more and more popular PCTG
* Update Ratrig.json
Add filament PCTG
* Update Ratrig.json
Filament setting for big (>0.4) nozzles
* Add files via upload
Filament setting for big (>0.4) nozzles
* Filament setting for big (>0.4) nozzles
Filament setting for big (>0.4) nozzles
* Optimized layer and extrusion values
Optimized layer and extrusion values
---------
Co-authored-by: SoftFever <softfeverever@gmail.com>
* Patch wxWidgets to automatically select dark theme variant (taken from
Bambu slicer flatpak manifest)
* Drop python script that selected dark theme
* Add a patch to fix libslic3r build
Avoid collisions with previous extrusions in the same layer when moving Z down in an XYZ move.
This happens for example when starting a scarf joint after another perimeter was already printed.
Fixes SoftFever#7191
Co-authored-by: SoftFever <softfeverever@gmail.com>
* Add BLOCKS RD50, ProS100 and RF50 printers
Add printer configurations and profiles for Blockstech printers to OrcaSlicer
* Update RF50 thumbnail
Added the definative thumbnail for the RF50 printer model.
* pa calib: print flow value and acceleration
Print flow value and acceleration for PA pattern calibration.
This should help keep track during adaptive PA calibration.
* pa pattern: fix legent section too wide in some cases
Rework pa pattern legent generation to correctly estimate
width of the legend section.
Current flow value now has variable length which is a longest of
PA value and the acceleration for a given test.
Few examples:
1. PA value are 4 characters: 0.04
Acceleratioion 3 chars: 400
Flow value will be 4 chars long: 7.98, or 11.3
2. PA: 0.018
Accel: 1000
Flow: 12.35, or 6.345
3. PA: 0.04
Accel: 15000
Flow: 34.34, or 4.567
Rework number-to-string conversion flow to correctly round values at
given precision.
Fixed Clipper library (our own fork of it) when working with Z coordinate:
The Eigen vector type compares all components, while the ClipperLib
own IntPoint type compared x and y only.
Fixed by overriding the ==/!= operators to compare just x and y components
for Eigen types.
Cherry-picked from prusa3d/PrusaSlicer@0202eec4b7
Co-authored-by: Vojtech Bubnik <bubnikv@gmail.com>
If layer starts with a color change, the full layer time will be much longer, which will trick the slicer to think this layer has enough cooling time.
However the actual filament extrusion time (the real "printing" part) won't necessarily have enough time to cool down, so if we don't do extra slowing down
before starting next layer, the filament could still be soft and lead to worse surface quality.
# Description
Re-Creation of Pull Request #6964 with X1E changes pulled.
OrcaSlicer includes exhaust fan settings for each filaments, however
these settings do not take effect on Bambu Labs machines that include
chamber temperature regulation fans.

Further investigation into the g-code files produced reveals that the
filament start g-code is responsible for using the air filtration
setting and sending the appropriate `M106 P3
S{during_print_exhaust_fan_speed_num[current_extruder]}` command to the
printer. However, this command, even with the setting enabled, is never
written to the final g-code file.
By default, Bambu Lab's filament profiles wrap this command up in` {if
activate_air_filtration[current_extruder] && support_air_filtration}`
clause, which always evaluates to false. As it turns out, the printer's
have the `support_air_filtration` flag set to `0` in the
`fdm_machine_common.json` file.
This change updates that value to `1` in the .json files for the X1,
X1C, X1E, and P1S 0.4mm nozzles. This is then inherited to other nozzle
sizes and user generated profiles. This is done by simply adding a line
` "support_air_filtration": "1",` to the .json to override the inherited
setting.
<!--
> Please provide a summary of the changes made in this PR. Include
details such as:
> * What issue does this PR address or fix?
> * What new features or enhancements does this PR introduce?
> * Are there any breaking changes or dependencies that need to be
considered?
-->
Fixes#6066
# Screenshots/Recordings/Graphs
N/A
## Tests
Updated this flag in a custom user config for the printer than tried
generating the code file with Air Filtration enabled and set to 70%
The appropriate `M106 P3 S178 ` appears in the filament start gcode
section of the file.
<!--
> Please provide a summary of the changes made in this PR. Include
details such as:
> * What issue does this PR address or fix?
> * What new features or enhancements does this PR introduce?
> * Are there any breaking changes or dependencies that need to be
considered?
-->
# Screenshots/Recordings/Graphs
<!--
> Please attach relevant screenshots to showcase the UI changes.
> Please attach images that can help explain the changes.
-->
## Tests
Updated this flag in a custom user config for the printer than tried
generating the code file with Air Filtration enabled and set to 70%
The appropriate `M106 P3 S178 ` appears in the filament start gcode
section of the file.
# Description
Added support for Creality Print (E.g. Orca can upload and print
directly to Ender 3 V3 KE)
# Screenshots/Recordings/Graphs
Video: https://www.youtube.com/watch?v=ONzaMJhj_Hk
## Tests
Tested in the video above on a Macbook Pro, Ender 3 V3 KE.
It should also be tested on Windows but I don't have a windows computer.
# Description
fixed#6987
# Screenshots/Recordings/Graphs
<!--
> Please attach relevant screenshots to showcase the UI changes.
> Please attach images that can help explain the changes.
-->
## Tests
<!--
> Please describe the tests that you have conducted to verify the
changes made in this PR.
-->
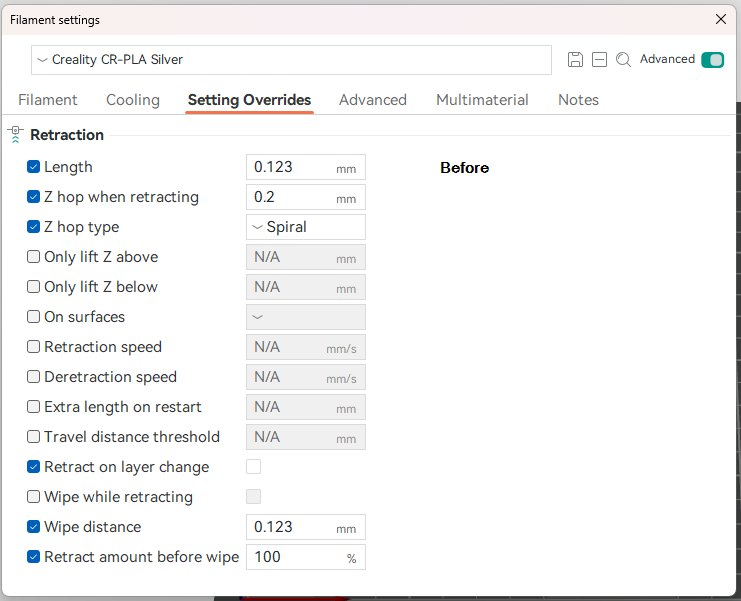
# Description
The idea behind this PR is to make it easier for the users to tweak
filament setting overrides i.e. reduce number of times users have to
switch between the printer and filament settings to compare the values.
# Screenshots/Recordings/Graphs


## Tests
I've done some manual testing to confirm:
* Override setting with the same value as extruder is still shown as a
change.
* Resetting unsaved override setting back to original value still works
as expected.
* Override settings are shown correctly on the next load after a save.
* Extruder settings changes are reflected on Settings Overrides page.
## Other
I have discovered a strange behaviour between `Filament Settings` and
`Printer Settings` windows. On a fresh load of application opening
`Filament Settings` window, navigating to `Settings Overrides` tab and
then closing the window results in `Filament` tab being opened the next
time `Filament Settings` window is opened. But if you open `Printer
settings` window, navigate to `Extruder` or `Motion ability` tabs then
the application changes the behaviour to open the last visited tab by
the user for both of the windows. I'm mentioning this because when this
happens the flow of events in the application changes and causes my
change to break until the user changes a tab. As far as I can tell for
some reason ConfigOptionsGroup's `reload_config` method is starting to
get called (second time?) after TabFilament's
`update_filament_overrides_page` method which wipes out the values set
by me. I'm not sure which is the correct behaviour, so I left that for a
discussion here. If last visited tab is the correct behaviour, then I
would need help to figure out how to fix this problem.
This PR moves the code around without any functional changes, so that all code related to supports now placed at the same location & structure as BambuStudio.
This makes merging updates from BambuStudio much easier in the future.
Resolves#5932
**The following changes made are made to all V-Core 4 versions**
- Improved cover's quality

- Added RatRig's PunkFil ABS, PETG, and PETG CF filaments
- Added PETG-CF10 filament type & RatRig to filament vendors
- Increased max z speed to 200 from 50 and max acceleration travel to
10,000 from 9,000
- Enabled wipe and z hop, as well as, increased retract before wipe to
70% from 0%
- Improved layer change G-Code
- Fixed pause G-Code
- Added extruder clearance parameters
*Almost all of these changes come from @nameisCruzCruz in #5932
…
# Description
This update, along with #6934, resolves the remaining issues with the
wipe tower.
The GCode class will no longer maintain its own Z height information
(m_nominal_z). Instead, it will utilize the Z height from GCodeWriter's
m_pos. This approach is less error-prone.
This PR also fixes#6755.
It also enforce "Enable Filament ramming" option
@igiannakas It should fix the wipe tower crashing issue
# Screenshots/Recordings/Graphs
<!--
> Please attach relevant screenshots to showcase the UI changes.
> Please attach images that can help explain the changes.
-->
## Tests
<!--
> Please describe the tests that you have conducted to verify the
changes made in this PR.
-->
* Russian translation update
The next russian translation update OrcaSlicer V2.1.1 Official Release.
The work done to improve translation, corrected errors.
Thx.
* Russian translation update
The next russian translation update OrcaSlicer v2.2.0-beta2.
The work done to improve translation, corrected errors.
Thx.
* Russian translation update
The next russian translation update OrcaSlicer V2.2.0-beta2 + 3 lines in text.js
The work done to improve translation, corrected errors.
Thx.
* WIP:only works after saving and then reloading
* working version of move plate to the front
* added icons for move to front
* removed a commented line
* fixed the move to front function to behave correctly with undo/redo actions
* Merge branch 'main' into feature/move_plate_to_the_front
* One top wall fixes
* Use one wall threshold set in GUI without limiting
* Updates to one wall top perimeter to address splitting top surface against too small segments and lettering overlap.
* Fix precise wall
* Merge branch 'main' into one-top-wall-fix-pr
* Merge branch 'main' into one-top-wall-fix-pr
* Pass all compatible regions to perimeter generator
* Simplify & unify fuzzify detection
* Simplify `to_thick_polyline`
* Group regions by fuzzy skin settings
* Initial code structure of multi-regional fuzzy skin
* Determine fuzzy type by all compatible regions
* Add fuzzy region debug
* Implement the line split algorithm
* Do splitted fuzzy in classic mode
* Disable debug macros
* Fix infinit loop issue when segment points are out of order
* Fix path connection
* Implement splitted fuzzy in Arachne mode
* Translation of missing phrases into Russian. Part 1
* Translation of missing phrases into Russian. Part 2
* Returned special terms that do not require translation and corrected an error
* Update localization/i18n/ru/OrcaSlicer_ru.po
* Some fixes
* Removed unnecessary format check rules
ENH: support spiral lift with timelapse gcode
The existing implementation did only read the new Z position from the injected timelapse_gcode and flagged the position as unsafe because of this.
This change reads X, Y and Z pos from the timelapgse_gcode and will keep the position state correct to enable safety checks required for using spiral Z hop.
Because of this, spiral Z hop can be used everyhwere now. The same pattern is also applied for layer_change/toolhead gcode injection.
The set_current_position_clear method is unused but will be kept in implementation for future scenarios.
Co-authored-by: Simon ziehmon@users.noreply.github.com
* Fix issue that github action windows build could not find win10sdk (SoftFever/OrcaSlicer#6724)
* Another attempt to fix the build issue
* This should work now
* Delete Readme.txt
Not in use
* Update SECURITY.md
Formatted and little changes made
* Update README.md
Improved format and texts, insert image at the top
* Added `duplicate plate` feature.
This the initial commit and this still needs work.
* [#2025] Fixed the SEGFAULT, apparently an icon id=6 needed to be updated to id=7 as we have one more plate icon.
[#2025] Removed the `printf` statements.
* [#2025] Plate duplication is now fully implemented.
* [#2025] Updated icons for plate duplicate funcctionality.
* [#2025] Added toolbar icon fro "Duplicate Current Plate" action.
* [#2025] Revert changes for `toolbar_add_plate_dark.svg`.
* [#2025] Removed the `BBS` label in the code that is not written by BBS.
* [#2025] Updated `.gitignore` to ignore VSCode workspace file.
* [#2025] Fixed the instances not transforming in global space when the plate is duplicated.
* [#2025] Removed the Duplicate Plate action from the plate actions and the toolbar.
* [#2025] Added the `Duplicate Current Plate` functionality to the `Edit` menu.
* [#2025] Addressed review comments.
* [#2025] Addressed review comments.
* [#2025] Removed unused icons related to the previously introduced "Duplicate Plate" functionality.
* Fix issue that `fuzzy_skin_first_layer` not respected by classic wall generator
* Fix issue that Contour / Contour and hole mode not working properly (SoftFever/OrcaSlicer#6414)
* We have `is_contour`, so need for complicated hole detection
Including a marathon of resolving merge conflicts due to PRs today.
We should abolish multi-line msgids :-)
# Description
This looks like a huge PR, but it is only fixes for typos and grammar.
On the previous PR #6638 I mistakenly used _en.po as the reference
instead of the .pot.
It caused missed strings in the source and other .po files.
This around I triple checked again to make sure the msgids are in sync
with the L"" strings in the code.
Comments, variable names and non-English translation strings were
excluded.
I learnt that typos were "fixed" before by using translations. After
this PR, those translations are no longer relevant and can be cleaned
up.
Hopefully this sets a new baseline which will last us a while. :-)
<!--
> Please provide a summary of the changes made in this PR. Include
details such as:
> * What issue does this PR address or fix?
> * What new features or enhancements does this PR introduce?
> * Are there any breaking changes or dependencies that need to be
considered?
-->
# Screenshots/Recordings/Graphs
<!--
> Please attach relevant screenshots to showcase the UI changes.
> Please attach images that can help explain the changes.
-->
## Tests
The code compiled and ran successfully.
The translation files were verified with ./run_gettext.sh
I did not se any issues when running ./run_gettext.sh --full
Please confirm it again, before the merge.
<!--
> Please describe the tests that you have conducted to verify the
changes made in this PR.
-->
Profile created based on information contained in the printer's firmware and profiles recommended by the manufacturer for Cura. It has been tested on various parts including 3DBenchy with more than satisfactory results.
* Update OrcaSlicer_es.po
* Update OrcaSlicer_es.po
* Upodate OrcaSlicer_es.po
* Update OrcaSlicer_es.po
* Update OrcaSlicer_es.po
* Add new translations and update existin from merged PR 6543
* Small fix in new msgid in OrcaSlicer_es.po
* Fix string start and termination quotes
* Fix string length?
* Update check_locale.yml
* testing with turkish translation
* test format
* fix format issues
* Ported filament shrinkage compensation from Prusa Slicer. Updated logic to be 100 = no shrinkage to be consistent with orca definitions
* Code comments update
* Merge branch 'main' into Filament-Shrinkage-compension---port-from-Prusa-slicer
* Merge remote-tracking branch 'upstream/main' into Filament-Shrinkage-compension---port-from-Prusa-slicer
* Merge branch 'main' into Filament-Shrinkage-compension---port-from-Prusa-slicer
* Kingroon KLP1 profiles
* Kingroon KP3S V1 profiles
* Make cover png file size more reasonable
* copy/paste error in the profile name
* Merge branch 'main' into kingroon-klp1-profiles
- add Breakaway Support filament
- add preheat params for Snapmaker Dual/IDEX printers
- update the check bounds code in start-gcode, which is now off by default
* Make sure the speed tab is properly hidden when toggle off advance mode
* Clear each page before clearing the parent, otherwise the child pages will be destroyed twice
* Fix crash if current selected tab is positioned after the removed tab
* Fix issue that sometimes the printer config first page is not displayed
* Fix issue that the wrong tab item get bold if the number of tabs changed
* update flow rate calibration tests
* more tweaks
* add YOLO linear flow rate calibration
* update name
* revert line_width changes
* Make it 2mm thick and change some text
* Update YOLO test:
Normal YOLO for 0.01 step
Perfectionist YOLO for 0.005 step
* add space
* Wiki home page fix links and readme update to link to wiki
* Update README.md
* Fixed developer reference links
* Update linkage from slicer settings to Wiki for layer height, line width and seam settings
* adaptive PA documentation
* Update adaptive-pressure-advance.md
* updated screenshots
* formatting
* Update adaptive-pressure-advance.md
* Update adaptive-pressure-advance.md
* Update adaptive-pressure-advance.md
* Include adaptive PA link
* Fix crash due to the wrong window get returned in `PointCtrl` (SoftFever/OrcaSlicer#6261).
`getWindow()` must return the control itself, not its child control; otherwise the child control will be destroyed twice when the tab container is destroyed.
* Fix another crash on Linux caused by unused undo button
* Fix build with CGAL 5.6
Surface_mesh iterators no longer return references, so it's necessary to
use const references or copies when iterating.
This was previously merged in #3045 but isn't references in the
current main branch anymore. No idea where why it is gone, but the issue
still persists thus the patch should still be added.
* Fix linux deps debug build
* Use the same DL_CACHE for release build when building debug version of deps on Linux.
This prevents downloading the same source packages twice, and avoid downloading again after deleting the build dir.
* Fix debug build
* Fix warnings "loop variable creates a copy from type" and "loop variable binds to a temporary constructed from type"
* Improvements in Inner Outer Inner wall ordering logic
* Updated to BFS algorithm, made ordering more robust and corrected edge cases
* Doc updates
* Refinements in perimeter sorting
* Removal of touch threshold and code debugging to improve sequencing
* Code cleanup
* Code refinements on perimeter distance thresholds
* Extend perimeter re-ordering to more than inset index 2, to reduce travel moves when printing neighbouring features
* Refinements to IOI perimeter re-ordering algorithm to improve travel scenarios where multiple external perimeters are contained in the same island.
* Documentation updates
* Removed unnecessary code
* Removed bespoke to_points function and replaced with ExtrusionLine member already present. Removed squaredDistance and replaced with Eigen library call.
* Refactor code to move distancing functions to the multipoint class. Renamed for more clarity on their purpose.
* Added SBS to filament_info.json
* Added SBS to Print.cpp
* added SBS to PrintConfig.cpp
* Added SBS to BBL
* Added SBS Template and also specified SBS as type in fdm_filament_sbs.json
* Updated settings for SBS in filament_sbs_template.json
* Applied SBS settings to fdm_filament_sbs.json
* added settings to Generic SBS @base.json
---------
Co-authored-by: Duan Gauche <duan.gauche@pdsvision.com>
Co-authored-by: SoftFever <softfeverever@gmail.com>
* Revert "Fix #3311: filament Load / Unload time was not used in time estimation (#3706)"
This reverts commit 252788419b.
* revamp tool/filament change time
* tweak message
* Use more readable data types for storing triangle splitting information.
* fix build errors
* SPE-2063: Determine correctly which extruders are used when the object is painted by the multi-material painting gizmo.
During the serialization of TriangleSelector and also during reading serialized painting data from 3MF, we cache all used states in the painted triangle mesh.
Based on this information, we can quickly determine which extruders are used and which don't.
* Fixed an bug that filament list was not updated properly
---------
Co-authored-by: Lukáš Hejl <hejl.lukas@gmail.com>
* Fix z hop performed after retraction in PA pattern calibration. Fix zhop config value not used
* Updated gathering of z hop value method for consistency
* Fix -Wsubobject-linkage warning
Having tk::spline header-only implementation included from
SmallAreaInfillFlowCompensator.hpp makes
SmallAreaInfillFlowCompensator::flowModel have separate (albeit the
same) implementation in each translation unit.
In order to fix this issue, SmallAreaInfillFlowCompensator::flowModel
converted to opaque 'pimpl'
* spline: remove anonymous namespace
Remove outer anonymous namespace from splice.h to make
forward declaration for tk::spline possible.
* fix gizmo bar wobbling
Gizmo bar is wobbling at specific application window width range.
This comes from a bar scaling calculations method:
- new scale calculated for already scaled bar
- scale stored as application settings loosing precision
Rework gizmo bar resizing code to remove feedback:
- calculate scale factor based on unscaled bar size
* rework gizmo bar scaling
Unify scaling implementation across platforms (MacOS, Win, Linux).
Now all platform scale bar setting icon size.
Toolbar scale is used for high-DPI displays scaling only.
* Add comments, reorganize changes to minimize diff
* Fix crash when filling very tiny (1-5nm) gaps (#6279)
Cherry-picked from prusa3d/PrusaSlicer@8784ca0ecf
Co-authored-by: Lukáš Hejl <hejl.lukas@gmail.com>
* SPE-2256: Fix the issue that we used the old Voronoi graph during the detection of invalid Voronoi diagrams.
This happens because we didn't set a modified flag that is required to be set before we use the new Voronoi graph.
Possibly related to #12385
Cherry-picked from prusa3d/PrusaSlicer@2de1f3aa45
Co-authored-by: Lukáš Hejl <hejl.lukas@gmail.com>
---------
Co-authored-by: Lukáš Hejl <hejl.lukas@gmail.com>
* Supress warnings on unused functions an variables
Compilation of OrcaSlicer produces 3056 warnings.
Nearly half of them related to unused functions and variables.
It is unlikely we going to clean them up since we may want to
keep code base as close to the BBS as possible
* initialize class member with correct value
* Fix memset arguments order
* Merge multiple statemensts into single
* fix -Wpessimizing-move
* Increase granularity of extrusion move splitting for small line segments ending in an overhang
* Parameter tweak
* Increase granularity of estimation for curled perimeters
* Adjust parameters following experimentation with overhang prints
* Updated overhang segmentation logic
* Cleanup code comments
This PR:
- Updates translation template to include new messages from #6009 and
updates <s>existing translation files</s> Korean translation file
accordingly
- Updates Korean translation, including new translations for #6009
# Description
Copied files from BambuStudio after downloading updated profiles.
Add support for BambuLab PETG-HF and Support for ABS. Fixes#6182
Also contains some changes to the default infill from crosshatch to
gyroid, and updated start g-code for A1.
# Tests
Copied all files to resources directory on install, and started.
Profiles showed up.
flush_length variable is now provide correct value based on the flush
matrix set by the user.
pesudo code in Change filament gcode:
```
...
T1
; Park head to the purging location
G1 X0 Y-5 F12000
; Purge certain amount of filament into waste bin
G1 E[flush_length] F600
...
```
This PR is based on the WIP tool changer branch #6087Fixes#4194#5937#5912
# Description
Add support of tool changer printers.
A new printer model has been added: `Generic ToolChanger`
Currently only support tool changer printers like `TapChanger` and
`StealthChanger`.
~Support for Prusa XL is still WIP.~ Prusa XL is supported now
~~⚠️WARNING⚠️ : please proceed with caution. It hasn't been tested on an
real printer yet. Please double check with g-code before printing it.~~
🚀GOOD NEWS🚀: Multiple successful prints have been reported; it should be
safe to try [Discord
Thread](https://discord.com/channels/1137181739773603922/1258993224018821160).
**For bugs, please kindly help by logging issues with details and sample
projects, then label them as ToolChanger. This will help me track
them.**
# Screenshots/Recordings/Graphs
https://github.com/SoftFever/OrcaSlicer/assets/103989404/bd518f77-5cc1-4b3a-ba76-7ead75494365
# Test
Feedback is welcomed!
For Mac users, please ref to this instruction:
https://github.com/SoftFever/OrcaSlicer#how-to-install
- [x] Occasionally crashes when change printer settings
- [x] Prusa XL profiles and custom gcode
- [x] Ooze prevention bug
- [x] Prusa XL z offset issue when prime tower is used
- [x] Preheat nozzle(temporary solution)
- [x] infinite(tall) skirt when both ooze prevention and skirt are
enabled
- [ ] skirt/purge cone overlap
- [ ] Document about custom variables
Implement #5943#2050#5079
* Fix calls to depreciated wxPen constructor
* Fix use of wxTimerEvent
* Fix unrecognized character escape sequence
* Fix signed/unsigned mismatch
At least as much as possible without significantly altering parts of the application
* Clean unreferenced variables
* fix mistyped namespace selector
* Update deprecated calls
* Fix preprocessor statement
* Remove empty switch statements
* Change int vector used as bool to bool vector
* Remove empty control statements and related unused code
* Change multi character constant to string constant
* Fix discarded return value
json::parse was being called on the object, rather than statically like it should be. Also, the value was not being captured.
* Rename ICON_SIZE def used by MultiMachine
By having the definition in the header, it causes issues when other files define ICON_SIZE. By renaming it to MM_ICON_SIZE, this lessens the issue. It would probably be ideal to have the definitions in the respective .cpp that use them, but it would make it less convenient to update the values if needed in the future.
* Remove unused includes
* Fix linux/macOS compilation
* Hide unused-function errors on non-Windows systems
* Disable signed/unsigned comparison mismatch error
* Remove/Disable more unused variables
Still TODO: check double for loop in Print.cpp
* Remove unused variable that was missed
* Remove unused variables in libraries in the src folder
* Apply temporary fix for subobject linkage error
* Remove/Disable last set of unused variables reported by GCC
* remove redundant for loop
* fix misspelled ifdef check
* Update message on dialog
* Fix hard-coded platform specific modifier keys
* Remove duplicate for loop
* Disable -Wmisleading-indentation warning
* disable -Wswitch warning
* Remove unused local typedefs
* Fix -Wunused-value
* Fix pragma error on Windows from subobject linkage fix
* Fix -Waddress
* Fix null conversions (-Wconversion-null)
---------
Co-authored-by: SoftFever <softfeverever@gmail.com>
* Fix crossing max x axis & rise max print height of Ender-3 V3 KE
* Merge branch 'main' into ender-3-V3-KE-4
* Merge branch 'main' into ender-3-V3-KE-4
* Adaptive Pressure advance options setup
* Dynamic PA - PCHIP interpolator code and tests
* Integrate dynamic PA with slicing code - emit new PA values per speed change
* Link adaptive PA to role change instead of speed change
* Adaptive PA - Alpha 2
Reduce the frequency of requested PA changes by introducing a "state" variable.
Implement user toggle for adapting PA for external walls for overhangs
* Hide adaptive PA for overhangs
* Convert Adaptive PA to use volumetric flow model and start preparing for converting to Gcode post processor
* Converted Dynamic PA to a post processing filter. Reverted changes in GCode cpp and created tagging mechanism to allow filter to apply PA changes.
* Removed adaptive PA for overhangs
* Foundations for two dimensional adaptive PA based on acceleration and volumetric flow speed
* Minor code cleanup and updating of tooltips
* Renaming files for better clarity and generate classes documentation
* Update src/libslic3r/PrintConfig.cpp
Co-authored-by: ElectricalBoy <15651807+ElectricalBoy@users.noreply.github.com>
* Update src/libslic3r/PrintConfig.cpp
Co-authored-by: ElectricalBoy <15651807+ElectricalBoy@users.noreply.github.com>
* Update src/libslic3r/PrintConfig.cpp
Co-authored-by: ElectricalBoy <15651807+ElectricalBoy@users.noreply.github.com>
* Introduce average mm3_mm over the length of a multipath for adaptive PA
* Updates for multipath handling part 2
* Introduce average mm3_mm over the length of a multipath for adaptive PA
* Trigger PA evaluation more frequently to catch edge cases where speed changes across islands of the same feature type.
* Updates for multipath handling part 2
* Adaptive PA: Implement average flow estimation on loops
* Code formatting
* Fix adaptive PA not adapting for small disconnected external wall line segments.
* Updated to take max print speed of upcoming feature to calculate new PA value.
This is to resolve issue of incorrect PA value used when starting a new feature at an overhang.
* Code clean up
* Performance tuning
* Further performance tuning by reducing use of regex commands in the nested loops and fix bug preventing gcode line output
* Further performance tuning and tweaks to stop searching for max speed after the first travel move.
* Reduce debug information
* Updated debug info
* Fix an issue on seams on specific models when wipe before external perimeter was enabled. Also cleanup documentation and add new to-do's
* Prepare for adaptive PA for overhangs, fix wipe bug & clean up code and comments
* Initial commit for adapting PA when extruding fully overhanging perimeters
* Ignore wipe command when identifying current print speed
* Option to evaluate adaptive PA on overhang regions in preparation for Klipper experimental option testing
* Update to issue PA changes for varying flow conditions within the same feature
* Fix bug where adaptive PA was enabled erroneously for role changes and ignoring user's preference.
* Refactored some code
* More refactoring
* Some bug fixes and enabled comments only when verbose g-code is enabled
* Introduced dedicated PA option for bridges
* Code refactoring to optimise initialisation of PA processor (making it faster). Fix a bug where PA was not always set after a toolchange. Improve general error handling and robustness.
* Updates to adaptive PA tooltips
* Bridging PA check with Epsilon instead of 0.
* Adaptive PA: addressing comments
---------
Co-authored-by: ElectricalBoy <15651807+ElectricalBoy@users.noreply.github.com>
removed imgui.set_requires_extra_frame(), this line causes Slic3r::GUI::GLCanvas3D::render() to be called repeatedly when 'Filament' or 'Speed' is selected for preview panel
* Flushing volumes button background color for active state
* Sliced plates bar > Use different colors on plate numbers for light / dark theme
* Remove 3D navigator background
* Device & Project Tab > Sidebar > Selected tab background color
* Merge branch 'SoftFever:main' into color-fixes-3
* Correct sidebar button color for light mode for bbl monitor / calibration and project page
* Homepage fixes
* Fix parameters group title color too bright on dark theme
* Search popup hovered item background color
* Sidebar > Search box > match border color with other input/combo boxes
* fix indents
* Add descriptions to statecolors
* Paint gizmos > remove background of non active Tool / Brush buttons on dark mode
* Merge branch 'SoftFever:main' into color-fixes-3
* Top bar / Main tab bar button hover background
* Fix broken color change from last merges
* Gizmos selected text background
* Keyboard shortcuts window selected tab bg color
* About page link color
* Project page fixes
* match disabled text color on combo boxes with input boxes
* Use better background color for disabled elements on dark mode
* match all colors for disabled elements
* BBL > Monitor tab > Add printer text and icon not visible on dark theme
* even darker bg color for homepage thumbnails
* Sidebar arrow not visible
* Better bg color for row highlighting
* match style of gizmo combo box
* Merge branch 'SoftFever:main' into color-fixes-3
* Revert changes for main tab bar background color of button while hover
Fix override that cause segfault and EGL initialization error
When user built Mesa from GIT and load it using env variables
LD_LIBRARY_PATH and LIBGL_DRIVERS_PATH
it override LD_LIBRARY_PATH inside AppImage but other variable
LIBGL_DRIVERS_PATH not override and it cause EGL init error.
* Flashforge-06-12: gcode and filament mapping
* 06-27 Add Chuanying x1 printer profiles
* 20240702-Flashforge Guider 2s process fix
* [07-10 Flashforge]: Add more layer height options for AD5M and more nozzles for G3U etc.
* Update fdm_klipper_common.json
* Update fdm_machine_common.json
* add new nozzle type
* add new nozzle type with filaments
* add new nozzle type with mechine files
* add new nozzle type with process files
* Update InfiMech.json
add new nozzle type
* Update InfiMech.json
* Update 0.08mm Extra Fine @InfiMech TX.json
* Update 0.12mm Fine @InfiMech TX.json
* Update 0.16mm Optimal @InfiMech TX.json
* Update 0.20mm Standard @InfiMech TX.json
* Update 0.24mm Draft @InfiMech TX.json
* added Prusa Mini with Input Shaper to profiles
* Merge branch 'SoftFever:main' into main
* refactoring to more reusable settings
* Merge branch 'SoftFever:main' into main
* added more processes, changed settings
* Merge branch 'main' of https://github.com/koppensb/OrcaSlicer
* Update 0.15mm Speed @MINIIS.json
* Update 0.10mm Speed @MINIIS.json
* changed to cubic because of speed
* Merge branch 'main' of https://github.com/koppensb/OrcaSlicer
* further changes after reviewing prusa slicer settings
* simplified machine settings
* retraction speeds according to prusa slicer
* Merge branch 'SoftFever:main' into main
* changed max flow according to prusa slicer
* Merge branch 'main' of https://github.com/koppensb/OrcaSlicer
* after clearification at the prusaslicer repository M900 got removed
* Merge branch 'SoftFever:main' into main
* precise wall per default
* Merge branch 'main' of https://github.com/koppensb/OrcaSlicer
* enable reverse overhang on odd by default
* added settings from prusa slicer
* changed cooling setings
* Merge branch 'SoftFever:main' into main
* changed default to inner-outer-inner wall
inner-outer-inner gives pretty good overhangs with better surface
* new profiles for bigger nozzles, changed some cooling settings according to prusaslicer
* profiles for different nozzles sizes, better speed settings
* initial layer height was wrong
* wrong initial layer height
* set the correct accelerations
* Merge branch 'main' of https://github.com/koppensb/OrcaSlicer
* changed firmware version number
* using pressure advance UI setting instead of custom filament g-code
* Merge branch 'SoftFever:main' into main
* Update Prusa Generic PC.json
* Update Prusa Generic PC.json
* changed max flow for PC
* added PVA filament profiles
* bug fix in filament loading
* Merge branch 'SoftFever:main' into main
* Merge branch 'SoftFever:main' into main
* changed line width according to prusa slicer
* Merge branch 'main' of https://github.com/koppensb/OrcaSlicer
* Merge branch 'main' into main
* changed heatbed temperature for Minis capabilities
* Merge branch 'main' of https://github.com/koppensb/OrcaSlicer
* Merge branch 'main' into main
* Merge branch 'SoftFever:main' into main
* set default support to snug
* changed default filament setting to the correct value
* Init port of Cura's MM interlocking
* Refactor a bit
* Fix crash when bottom surface is multi-color
* Fix crash when boundary avoidance is 0
* Add config
---------
Co-authored-by: SoftFever <softfeverever@gmail.com>
* creating settings for printer and some UI changes work
* related filament diameter and pellet flow changes to each other
* UI name change to turn Filament to Material
* updated the flow coefficient to filament diameter formula
* updated the preset for the configuration wizard
* configuration changes for the final release
* config changes and preset bundle sync removed
* start gcode change for ginger machines
* added explanation of relationship between pellet_flow_coefficient and filament_diameter
* Added tooltip. Fixed Ginger machine configuration, Added docs
* add missing includes
Building without precompiled header support revealed some missing
includes that are added with this change for code health purposes.
Those missing includes were hidden by precompiled header support due to
the fact that the precompiled header file provides some definitions
despite not being defined in directly or indirectly included header
files.
Linux distros started removing libwebkit2gtk-4.0 libriry from their
repos. Ubuntu Noble (24.04) is one of them.
Modify debian/ubuntu deps to install libwebkit2gtk-4.1 if
no libwebkit2gtk-4.0 available
* Flashforge-06-12: gcode and filament mapping
* Merge branch 'SoftFever:main' into main
* Merge branch 'SoftFever:main' into main
* 06-27 Add Chuanying x1 printer profiles
* Update printer profiles
* Fix accelerations
* Fix z hop
* Small fixes
* Update layer height according to printer data sheet
---------
Co-authored-by: SoftFever <softfeverever@gmail.com>
add some series of printer parameter configurations. 15 Geeetech printers, including 3 series models.
Thunder series. A high-speed printer and the maximum printing speed can reach 300 mm/s. Mizar series. A machine that has very exquisite print quality and ultra quiet printing. Other Geeetech printers.
---Request from Geeetech offical .
Co-authored-by: SoftFever <softfeverever@gmail.com>
* Do not use get_scaling_factor then construct the matrix again, because it cannot properly handle situations that contains negative scale (mirror) / shear (SoftFever/OrcaSlicer#5578)
* Do not use get_scaling_factor then construct the matrix again, because it cannot properly handle situations that contains negative scale (mirror) / shear (SoftFever/OrcaSlicer#5578, SoftFever/OrcaSlicer#4719)
* Fix regression, always create SmallAreaInfillFlowCompensator model
small_area_infill_flow_compensation is per-region parameter, it's not necessary to iterate though all regions to check whether to create a model.
* Make SmallAreaInfillFlowCompensator robus.
1. handle spaces/tabs/new lines etc
2. don't throw expection, fall back to no-op instead if parsing failed
* Fixing an issue that changing small_area_infill_flow_compensation per modifier didn't take effect
underscore-arch:${{ inputs.os == 'macos-12' && '_' || ''}}${{ inputs.os == 'macos-12' && inputs.arch || '' }}# if is macos, make a string that does "_{arch}", else output nothing
dash-arch:${{ inputs.os == 'macos-12' && '-' || ''}}${{ inputs.os == 'macos-12' && inputs.arch || '' }}# if is macos, make a string that does "-{arch}", else output nothing
underscore-arch:${{ inputs.os == 'macos-14' && '_' || ''}}${{ inputs.os == 'macos-14' && inputs.arch || '' }}# if is macos, make a string that does "_{arch}", else output nothing
dash-arch:${{ inputs.os == 'macos-14' && '-' || ''}}${{ inputs.os == 'macos-14' && inputs.arch || '' }}# if is macos, make a string that does "-{arch}", else output nothing
# If there's problems with the X display, try this
# -v /tmp/.X11-unix:/tmp/.X11-unix \
# If you get an error like "Authorization required, but no authorization protocol specified," run line 9 in your terminal before rerunning this program
# xhost +local:docker
docker run \
`# Use the hosts networking. Printer wifi and also dbus communication` \
The only official platforms for OrcaSlicer are **our GitHub project page**, <a href="https://www.orcaslicer.com/">**orcaslicer.com**</a>, and the <a href="https://discord.gg/P4VE9UY9gJ">**official Discord channel**</a>.
Please be aware that "**orcaslicer.net**", "**orcaslicer.co**" or "**orca-slicer.com**" are NOT an official website for OrcaSlicer and may be potentially malicious. These sites appear to use AI-generated content, lacking genuine context and seems to exist solely to profit from advertisements. Worse, it may redirect download links to harmful sources. For your safety, avoid downloading OrcaSlicer from this site as the links may be compromised.
If you see the above sites in your searches, report them as spam or unsafe to the search engine. This small action will assist everyone.
We deeply value our OrcaSlicer community and appreciate all the social groups that support us. However, it is crucial to address the risk posed by any group that falsely claims to be official or misleads its members. If you encounter such a group or are part of one, please assist by encouraging the group owner to add a clear disclaimer or by alerting its members.
Thank you for your vigilance and support in keeping our community safe!
# Main features
- Autocalibrations for all printers
- Sandwich(inner-outer-inner) mode - an improved version of the `External perimeters first` mode
- Auto-calibration for all printers
- Sandwich(inner-outer-inner) mode - An improved version of the `External Perimeters First` mode
-More features can be found in [change notes](https://github.com/SoftFever/OrcaSlicer/releases/)
-Additional features can be found in the [change notes](https://github.com/SoftFever/OrcaSlicer/releases/)
# Wiki
The wiki below aims to provide a detailed explanation of the slicer settings, including how to maximize their use and how to calibrate and set up your printer.
Please note that the wiki is a work in progress. We appreciate your patience as we continue to develop and improve it!
**[Access the wiki here](https://github.com/SoftFever/OrcaSlicer/wiki)**
# Download
@@ -40,7 +64,7 @@ Explore the latest developments in Orca Slicer with our nightly builds. Feedback
**Mac**:
1. Download the DMG for your computer: `arm64` version for Apple Silicon and `x86_64` for Intel CPU.
2. Drag OrcaSlicer.app to Application folder.
3.*If you want to run a build from a PR, you also need following instructions below*
3.*If you want to run a build from a PR, you also need to follow the instructions below:*
<details quarantine>
- Option 1 (You only need to do this once. After that the app can be opened normally.):
- Step 1: Hold _cmd_ and right click the app, from the context menu choose **Open**.
@@ -58,15 +82,15 @@ Explore the latest developments in Orca Slicer with our nightly builds. Feedback
OrcaSlicer is originally forked from Bambu Studio, it was previously known as BambuStudio-SoftFever.
@@ -153,5 +185,5 @@ The GNU Affero General Public License, version 3 ensures that if you use any par
Orca Slicer includes a pressure advance calibration pattern test adapted from Andrew Ellis' generator, which is licensed under GNU General Public License, version 3. Ellis' generator is itself adapted from a generator developed by Sineos for Marlin, which is licensed under GNU General Public License, version 3.
The bambu networking plugin is based on non-free libraries from Bambulab. It is optional to the Orca Slicer and provides extended functionalities for Bambulab printer users.
The Bambu networking plugin is based on non-free libraries from BambuLab. It is optional to the Orca Slicer and provides extended functionalities for Bambulab printer users.
POLICY: Our security policy is to avoid leaving the ecosystem worse than we found it. Meaning we are not planning to introduce vulnerabilities into the ecosystem.
The OrcaSlicer team and community take all security bugs in OrcaSlicer seriously. Thank you for improving the security of OrcaSlicer. We appreciate your efforts to disclose the issue responsibly, and will make every effort to acknowledge your contributions.
# Security Policy
Report security bugs by emailing the lead maintainer at softfeverever@gmail.com and include the word "SECURITY" in the subject line.
At OrcaSlicer, we are committed to maintaining the security of our ecosystem. Our policy is to ensure that we do not introduce vulnerabilities and that any security issues are addressed promptly and responsibly. We appreciate your help in improving the security of OrcaSlicer and thank you for your responsible disclosure.
Reporting Security Bugs
The lead maintainer will acknowledge your email within a week (7 days), and will send a more detailed response up to 48 hours after that indicating the next steps in handling your report. After the initial reply to your report, the security team will endeavor to keep you informed of the progress towards a fix and an announcement. We may ask for additional information or guidance.
## To report a security bug, please follow these guidelines:
OrcaSlicer will confirm the problem and determine the affected versions.
OrcaSlicer will audit code to find any similar problems.
OrcaSlicer will prepare fixes for all releases still under maintenance. These fixes will be released as fast as possible.
Report security bugs in third-party modules to the person or team maintaining the module.
* Email Security Bugs:
Send an email to the lead maintainer at softfeverever@gmail.com.
Include the word "SECURITY" in the subject line of your email.
SECURITY DISCLOSURE: Your responsibility is to report vulnerabilities to us using the guidelines outlined below.
Please give detailed steps on how to disclose the vulnerability. Keep these OWASP guidelines in mind ( https://www.owasp.org/index.php/Vulnerability_Disclosure_Cheat_Sheet ) when creating your disclosure policy.
* Response Times:
The lead maintainer will acknowledge receipt of your email within one week (7 days).
A detailed response will follow within 48 hours, outlining the next steps for handling your report.
After the initial reply, the security team will keep you informed about the progress toward a fix and any announcements.
Below are some recommendations for security disclosures:
* Information and Collaboration:
We may request additional information or guidance as we work on addressing the issue.
When disclosing vulnerabilities please do the following:
Your name and affiliation (if any).
Include scope of vulnerability. Let us know who could use this exploit.
Document steps to identify the vulnerability. It is important that we can reproduce your findings.
Show how to exploit vulnerability, give us an attack scenario.
OrcaSlicer Checklist: Security Recommendations
Follow these steps to improve security when using OrcaSlicer.
* Handling the Report:
OrcaSlicer will confirm the problem and determine the affected versions.
We will audit the code to find any similar issues and prepare fixes for all releases still under maintenance.
Fixes will be released as quickly as possible.
...SEE SOMETHING
...SAY SOMETHING
1)...SEE SOMETHING
We suggest you goto #2 if this happens.
* Third-Party Modules:
Report security issues in third-party modules to the respective maintainer of those modules.
Why? Through experience we have found it is best to goto #2 in this situation.
## Security Disclosure Guidelines
When disclosing a vulnerability, please follow these steps to ensure your report is clear and actionable:
* Provide Detailed Information:
Scope: Clearly define the scope of the vulnerability.
Potential Impact: Let us know who could be affected by this exploit.
Reproduction Steps: Document detailed steps to reproduce the vulnerability.
Reference OWASP Guidelines:
Follow the <a href="https://cheatsheetseries.owasp.org/cheatsheets/Vulnerability_Disclosure_Cheat_Sheet.html">OWASP Vulnerability Disclosure Cheat Sheet</a> for best practices in vulnerability disclosure.
## Security Recommendations
To enhance security when using OrcaSlicer, we recommend following these steps:
* SEE SOMETHING: If you notice anything suspicious or have concerns, please report it.
* SAY SOMETHING: If you have any doubts or need assistance, do not hesitate to contact us.
### Thank you for your commitment to the security of OrcaSlicer. Your efforts help us maintain a safe and reliable ecosystem.
**NOTE**: After completing the calibration process, remember to create a new project in order to exit the calibration mode.
**NOTE2**: @ItsDeidara has made a webpage to help with the calculation. Check it out if those equations give you a headache [here](https://orcalibrate.com/).
> [!IMPORTANT]
> After completing the calibration process, remember to create a new project in order to exit the calibration mode.
> [!TIP]
> @ItsDeidara has made a webpage to help with the calculation. Check it out if those equations give you a headache [here](https://orcalibrate.com/).
# Flow rate
##### *NOTE: For Bambulab X1/X1C users, make sure you do not select the 'Flow calibration' option.*
5. Update the flow ratio in the filament settings using the following equation: `FlowRatio_old*(100 + modifier)/100`. If your previous flow ratio was `0.98` and you selected the block with a flow rate modifier of `+5`, the new value should be calculated as follows: `0.98x(100+5)/100 = 1.029`.** Remember** to save the filament profile.
5. Update the flow ratio in the filament settings using the following equation: `FlowRatio_old*(100 + modifier)/100`. If your previous flow ratio was `0.98` and you selected the block with a flow rate modifier of `+5`, the new value should be calculated as follows: `0.98x(100+5)/100 = 1.029`.** Remember** to save the filament profile.
6. Perform the `Pass 2` calibration. This process is similar to `Pass 1`, but a new project with ten blocks will be generated. The flow rate modifiers for this project will range from `-9 to 0`.
7. Repeat steps 4 and 5. In this case, if your previous flow ratio was 1.029 and you selected the block with a flow rate modifier of -6, the new value should be calculated as follows: `1.029x(100-6)/100 = 0.96726`. **Remember** to save the filament profile.
7. Repeat steps 4. and 5. In this case, if your previous flow ratio was 1.029 and you selected the block with a flow rate modifier of -6, the new value should be calculated as follows: `1.029x(100-6)/100 = 0.96726`. **Remember** to save the filament profile.
Orca Slicer includes three approaches for calibrating the pressure advance value. Each method has its own advantages and disadvantages. It is important to note that each method has two versions: one for a direct drive extruder and one for a Bowden extruder. Make sure to select the appropriate version for your test.
##### *NOTE: For Bambulab X1/X1C users, make sure you do not select the 'Flow calibration' option when printings.*
Orca Slicer includes three approaches for calibrating the pressure advance value. Each method has its own advantages and disadvantages. It is important to note that each method has two versions: one for a direct drive extruder and one for a Bowden extruder. Make sure to select the appropriate version for your test.
> [!WARNING]
> For Marlin: Linear advance must be enabled in firmware (M900). **Not all printers have it enabled by default.**
> [!WARNING]
> For Bambulab X1/X1C users, make sure you do not select the 'Flow calibration' option when printings.
@@ -59,11 +73,20 @@ The pattern method is adapted from [Andrew Ellis' pattern method generator](http
[Instructions for using and reading the pattern method](https://ellis3dp.com/Print-Tuning-Guide/articles/pressure_linear_advance/pattern_method.html) are provided in [Ellis' Print Tuning Guide](https://ellis3dp.com/Print-Tuning-Guide/), with only a few Orca Slicer differences to note.
First and foremost, when you initiate the test, you'll only see a small rectangular prism on the plate. This object serves a few purposes:
Test configuration window allow user to generate one or more tests in a single projects. Multiple tests will be placed on each plate with extra plates added if needed.
1.The test pattern itself is added in as custom G-Code at each layer, same as you could do by hand actually. The rectangular prism gives us the layers in which to insert that G-Code. This also means that **you'll see the full test pattern when you move to the Preview pane**
1.Single test \

2. Batch mode testing (multiple tests on a sinle plate) \
Once test generated, one or more small rectangular prisms could be found on the plate, one for each test case. This object serves a few purposes:
1. The test pattern itself is added in as custom G-Code at each layer, same as you could do by hand actually. The rectangular prism gives us the layers in which to insert that G-Code. This also means that **you'll see the full test pattern when you move to the Preview pane**:
2. The prism acts as a handle, enabling you to move the test pattern wherever you'd like on the plate by moving the prism
3.The filament selected for the prism is also used for the test pattern
3.Each test object is pre-configured with target parameters which are reflected in the objects name. However, test parameters may be adjusted for each prism individually by referring to the object list pane:
Next, Ellis' generator provided the ability to adjust specific printer, filament, and print profile settings. You can make these same changes in Orca Slicer by adjusting the settings in the Prepare pane as you would with any other print. When you initiate the calibration test, Ellis' default settings are applied. A few things to note about these settings:
@@ -126,7 +149,8 @@ You can also return to OrcaSlicer in the "Preview" tab, make sure the color sche

#### *NOTE You may also choose to conservatively reduce the flow by 5-10% to ensure print quality.*
> [!NOTE]
> You may also choose to conservatively reduce the flow by 5-10% to ensure print quality.
***
*Credits:*
@@ -135,4 +159,4 @@ You can also return to OrcaSlicer in the "Preview" tab, make sure the color sche
- *The PA Tower method is inspired by [Klipper](https://www.klipper3d.org/Pressure_Advance.html)*
- *The temp tower model is remixed from [Smart compact temperature calibration tower](https://www.thingiverse.com/thing:2729076)
- *The max flowrate test was inspired by Stefan(CNC Kitchen), and the model used in the test is a remix of his [Extrusion Test Structure](https://www.printables.com/model/342075-extrusion-test-structure).
We have divided it roughly into the following pages:
Orca slicer is a powerful open source slicer for FFF (FDM) 3D Printers. This wiki page aims to provide an detailed explanation of the slicer settings, how to get the most out of them as well as how to calibrate and setup your printer.
* [Calibration](wiki/Calibration)
* [Print settings](wiki/Print-settings)
* [How to build Orca Slicer](wiki/How-to-build)
The Wiki is work in progress so bear with us while we get it up and running!
## Print Settings, Tips and Tricks (Work In Progress)
The below sections provide a detailed settings explanation as well as tips and tricks in setting these for optimal print results.
The guide below takes you through the key calibration tests in Orca - flow rate, pressure advance, print temperature, retraction, tolerances and maximum volumetric speed
3. Filament (type `filament`). Example: `Generic PLA @Orca 3D Fuse1@.json`
4. Process (type `process`). Example: `0.10mm Standard @Orca 3D Fuse1 0.2.json`
Additionally, there is an overall meta file for each vendor (`Orca 3D.json`).
For easier understanding, let's consider a scenario with a printer manufacturer called `Orca 3D`. The manufacturer offers one printer model called `Fuse 1`, which supports 0.2/0.4/0.6/0.8mm nozzles and common market filaments.
In this case:
- Vendor profile: `Orca 3D`
- Printer profile: `Orca 3D Fuse1`
- Printer variant profile: `Orca 3D Fuse1 0.4 nozzle`
- Filament profile: `Generic PLA @Orca 3D Fuse1@`
- Process profile: `0.20mm Standard @Orca 3D Fuse1 0.4`
The profile name should be same as the filename without the `.json` extension in principal.
5. Process profile: `layer_height` + `preset_name` + " @" + `vendor_name` + `printer_name`/`printer_variant_name` + `.json` (`preset_name` typically includes "standard," "fine," "fast," "draft," etc.)
A typical file structure for a vendor:
```
resources\profiles\
- Orca 3D.json
- Orca 3D\
- machine\
- Orca 3D Fuse1.json
- Orca 3D Fuse1 0.2 nozzle.json
- Orca 3D Fuse1 0.4 nozzle.json
- process\
- 0.10mm Standard @Orca 3D Fuse1 0.2.json
- 0.20mm Standard @Orca 3D Fuse1 0.4.json
- filament\
- Generic PLA @Orca 3D Fuse1@.json
```
**NOTE 1**: Use short vendor names in filenames to avoid excessive length.
**NOTE 2**: Filament profiles are **optional**. Create them only if the vendor has specifically tuned profiles for the given printer. See [Filament profiles](#filament-profiles) for details.
## Filament Profiles
OrcaSlicer features a global filament library called `OrcaFilamentLibrary`, which is automatically available for all printers. It includes generic filaments like `Generic PLA @System` and `Generic ABS @System` etc.
Printer vendors can override specific filaments in the global library for certain printer models by creating new filament profiles.
Relationship diagram:
```mermaid
graph TD;
OrcaFilamentLibrary-->Orca_3D_filament;
OrcaFilamentLibrary-->Vendor_A_filament;
OrcaFilamentLibrary-->Vendor_B_filament;
```
**NOTE**: Create new filament profiles only if you have truly specifically tuned the filament for the given printer. Otherwise, use the global library. The global library has a better chance to receive optimizations and updates from OrcaSlicer contributors, which will benefit users of all printers.
### Adding Filament Profiles to the Global Library
In this section, we will discuss how to add a new filament profile into the global library.
If you want to add a new generic profile into the global library, you need to create a new file in the `resources\profiles\OrcaFilamentLibrary\filament` folder. If a base type already exists in the global library, you can use this file as a base profile by inheriting it.
The following sample JSON file shows how to create a new generic filament profile `Generic PLA-GF @System` in the global library.
1. The first step is to create a new file in the `resources\profiles\OrcaFilamentLibrary\filament` folder. The file name should be `Generic PLA-GF @System.json`. Please note that we leave the `compatible_printers` field empty so that it is available for all printers.
```json
{
"type":"filament",
"filament_id":"GFL99",
"setting_id":"GFSA05",
"name":"Generic PLA-GF @System",
"from":"system",
"instantiation":"true",
"inherits":"fdm_filament_pla",
"filament_type":["PLA-GF"],
"filament_flow_ratio":[
"0.96"
],
"compatible_printers":[]
}
```
2. Register the profile in `resources\profiles\OrcaFilamentLibrary.json`:
```json
{
"name":"OrcaFilamentLibrary",
"version":"02.02.00.04",
"force_update":"0",
"description":"Orca Filament Library",
"filament_list":[
// ...
{
"name":"Generic PLA-GF @System",
"sub_path":"filament/Generic PLA-GF @System.json"
}
]
}
```
3. The last step is to validate the newly added filament profiles. You can run OrcaSlicer to verify if the filament you just added is available and usable. You can also use the [Orca profile validator](https://github.com/SoftFever/Orca_tools/releases/tag/1) tool to help debug any errors. **NOTE**: You need to delete the `%appdata%/OrcaSlicer/system` folder to force OrcaSlicer to reload your lastest changes.
The process is the same if you want to add a new brand filament profile into the global library. You need to create a new file in the `resources\profiles\OrcaFilamentLibrary\filament\brand_name` folder. The only difference is that you should put the file into the brand's own subfolder.`resources\profiles\OrcaFilamentLibrary\filament\brand_name`.
### Adding Filament Profiles to Printer Vendor Library
In this section, we will discuss how to add a new filament profile for a certain vendor.
If you want to add a new filament profile, whether it's a brand new profile or a specialized version of a global filament profile for a given printer, you need to create a new file in the `resources\profiles\vendor_name\filament` folder. If a base type already exists in the global library, you can use this file as a base profile by inheriting it.
Below is a sample JSON file showing how to create a specialized `Generic ABS` filament profile for the ToolChanger printer.
Please note that here we must leave the compatible_printers field non-empty, unlike in the global library.
This feature aims to dynamically adjust the printer’s pressure advance to better match the conditions the toolhead is facing during a print. Specifically, to more closely align to the ideal values as flow rate, acceleration, and bridges are encountered.
This wiki page aims to explain how this feature works, the prerequisites required to get the most out of it as well as how to calibrate it and set it up.
## Settings Overview
This feature introduces the below options under the filament settings:
1.**Enable adaptive pressure advance:** This is the on/off setting switch for adaptive pressure advance.
2.**Enable adaptive pressure advance for overhangs:** Enable adaptive PA for overhangs as well as when flow changes within the same feature. This is an experimental option because if the PA profile is not set accurately, it will cause uniformity issues on the external surfaces before and after overhangs. It is recommended to start with this option switched off and enable it after the core adaptive pressure advance feature is calibrated correctly.
3.**Pressure advance for bridges:** Sets the desired pressure advance value for bridges. Set it to 0 to disable this feature. Experiments have shown that a lower PA value when printing bridges helps reduce the appearance of slight under extrusion immediately after a bridge, which is caused by the pressure drop in the nozzle when printing in the air. Therefore, a lower pressure advance value helps counteract this. A good starting point is approximately half your usual PA value.
4.**Adaptive pressure advance measurements:** This field contains the calibration values used to generate the pressure advance profile for the nozzle/printer. Input sets of pressure advance (PA) values and the corresponding volumetric flow speeds and accelerations they were measured at, separated by a comma. Add one set of values per line. More information on how to calibrate the model follows in the sections below.
5.**Pressure advance:** The old field is still needed and is required to be populated with a PA value. A “good enough” median PA value should be entered here, as this will act as a fallback value when performing tool changes, printing a purge/wipe tower for multi-color prints as well as a fallback in case the model fails to identify an appropriate value (unlikely but it’s the ultimate backstop).
<img width="452" alt="Adaptive PA settings" src="https://github.com/user-attachments/assets/68c46885-54c7-4123-afa0-762d3995185f">
## Pre-Requisites
This feature has been tested with Klipper-based printers. While it may work with Marlin or Bambu lab printers, it is currently untested with them. It shouldn’t adversely affect the machine; however, the quality results from enabling it are not validated.
**Older versions of Klipper used to stutter when pressure advance was changed while the toolhead was in motion. This has been fixed with the latest Klipper firmware releases. Therefore, make sure your Klipper installation is updated to the latest version before enabling this feature, in order to avoid any adverse quality impacts.**
Klipper firmware released after July 11th, 2024 (version greater than approximately v0.12.0-267) contains the above fix and is compatible with adaptive pressure advance. If you are upgrading from an older version, make sure you update both your Klipper installation as well as reflash the printer MCU’s (main board and toolhead board if present).
## Use case (what to expect)
Following experimentation, it has been noticed that the optimal pressure advance value is less:
1. The faster you print (hence the higher the volumetric flow rate requested from the toolhead).
2. The larger the layer height (hence the higher the volumetric flow rate requested from the toolhead).
3. The higher the print acceleration is.
What this means is that we never get ideal PA values for each print feature, especially when they vary drastically in speed and acceleration. We can tune PA for a faster print speed (flow) but compromise on corner sharpness for slower speeds or tune PA for corner sharpness and deal with slight corner-perimeter separation in faster speeds. The same goes for accelerations as well as different layer heights.
This compromise usually means that we settle for tuning an "in-between" PA value between slower external features and faster internal features so we don't get gaps, but also not get too much bulging in external perimeters.
**However, what this also means is that if you are printing with a single layer height, single speed, and acceleration, there is no need to enable this feature.**
Adaptive pressure advance aims to address this limitation by implementing a completely different method of setting pressure advance. **Following a set of PA calibration tests done at different flow rates (speeds and layer heights) and accelerations, a pressure advance model is calculated by the slicer.** Then that model is used to emit the best fit PA for any arbitrary feature flow rate (speed) and acceleration used in the print process.
In addition, it means that you only need to tune this feature once and print across different layer heights with good PA performance.
Finally, if during calibration you notice that there is little to no variance between the PA tests, this feature is redundant for you. **From experiments, high flow nozzles fitted on high-speed core XY printers appear to benefit the most from this feature as they print with a larger range of flow rates and at a larger range of accelerations.**
### Expected results:
With this feature enabled there should be absolutely no bulge in the corners, just the smooth rounding caused by the square corner velocity of your printer.
Compared to with this feature disabled, where the internal solid infill and external-internal perimeters show signs of separation and under extrusion, when PA is tuned for optimal external perimeter performance as shown below.
## How to calibrate the adaptive pressure advance model
### Defining the calibration sets
Firstly, it is important to understand your printer speed and acceleration limits in order to set meaningful boundaries for the calibrations:
1.**Upper acceleration range:** Do not attempt to calibrate adaptive PA for an acceleration that is larger than what the Klipper input shaper calibration tool recommends for your selected shaper. For example, if Klipper recommends an EI shaper with 4k maximum acceleration for your slowest axis (usually the Y axis), don’t calibrate adaptive PA beyond that value. This is because after 4k the input shaper smoothing is magnified and the perimeter separations that appear like PA issues are caused by the input shaper smoothing the shape of the corner. Basically, you’d be attempting to compensate for an input shaper artefact with PA.
2.**Upper print speed range:** The Ellis PA pattern test has been proven to be the most efficient and effective test to run to calibrate adaptive PA. It is fast and allows for a reasonably accurate and easy-to-read PA value. However, the size of the line segments is quite small, which means that for the faster print speeds and slower accelerations, the toolhead will not be able to reach the full flow rate that we are calibrating against. It is therefore generally not recommended to attempt calibration with a print speed of higher than ~200-250mm/sec and accelerations slower than 1k in the PA pattern test. If your lowest acceleration is higher than 1k, then proportionally higher maximum print speeds can be used.
**Remember:** With the calibration process, we aim to create a PA – Flow Rate – Acceleration profile for the toolhead. As we cannot directly control flow rate, we use print speed as a proxy (higher speed -> higher flow).
With the above in mind, let’s create a worked example to identify the optimal number of PA tests to calibrate the adaptive PA model.
**The below starting points are recommended for the majority of Core XY printers:**
**That means we need to run 3x4 = 12 PA tests and identify the optimal PA for them.**
Finally, if the maximum acceleration given by input shaper is materially higher than 4k, run a set of tests with the higher accelerations. For example, if input shaper allows a 6k value, run PA tests as below:
So, at worst case you will need to run 5x4 = 20 PA tests if your printer acceleration is on the upper end! In essence, you want enough granularity of data points to create a meaningful model while also not overdoing it with the number of tests. So, doubling the speed and acceleration is a good compromise to arrive at the optimal number of tests.
For this example, let’s assume that the baseline number of tests is adequate for your printer:
Test sample above was done with acceleration 12000 mm/s² and flow rate 27.13 mm³/s
#### OrcaSlicer 2.1.0 and older.
As mentioned earlier, **the print speed is used as a proxy to vary the extrusion flow rate**. Once your PA test is set up, change the gcode preview to “flow” and move the horizontal slider over one of the herringbone patterns and take note of the flow rate for different speeds.
It is recommended that the PA step is set to a small value, to allow you to make meaningful distinctions between the different tests –**therefore a PA step value of 0.001 is recommended. **
**Set the end PA to a value high enough to start showing perimeter separation for the lowest flow (print speed) and acceleration test.** For example, for a Voron 350 using Revo HF, the maximum value was set to 0.05 as that was sufficient to show perimeter separation even at the slowest flow rates and accelerations.
**If the test is too big to fit on the build plate, increase your starting PA value or the PA step value accordingly until the test can fit.** If the lowest value becomes too high and there is no ideal PA present in the test, focus on increasing the PA step value to reduce the number of herringbones printed (hence the size of the print).
PA pattern calibration configuration window have been changed to simplify test setup. Now all is needed is to fill list of accelerations and speeds into relevant fields of the calibration window:
Test patterns generated for each acceleration-speed pair and all parameters are set accordingly. No additional actions needed from user side. Just slice and print all plates generated.
Refer to [Calibration Guide](./Calibration) for more details on batch mode calibration.
#### OrcaSlicer 2.2.0 and older
Setup your PA test as usual from the calibration menu in Orca slicer. Once setup, your PA test should look like the below:
<img width="437" alt="PA calibration test 1" src="https://github.com/user-attachments/assets/1e6159fe-c3c5-4480-95a1-4383f1fae422">
<img width="437" alt="Pa calibration test 2" src="https://github.com/user-attachments/assets/c360bb18-a97a-4f37-b5a3-bb0c67cac2b6">
Now input your identified print speeds and accelerations in the fields above and run the PA tests.
**IMPORTANT:** Make sure your acceleration values are all the same in all text boxes. Same for the print speed values and Jerk (XY) values. Make sure your Jerk value is set to the external perimeter jerk used in your print profiles.
#### Test results processing
Now run the tests and note the optimal PA value, the flow, and the acceleration. You should produce a table like this:
Concatenate the PA value, the flow value, and the acceleration value into the final comma-separated sets to create the values entered in the model as shown above.
**You’re now done! The PA profile is created and calibrated!**
Remember to paste the values in the adaptive pressure advance measurements text box as shown below, and save your filament profile.
The adaptive PA model built into the slicer is flexible enough to allow for as many or as few increments of flow and acceleration as you want. Ideally, you want at a minimum 3x data points for acceleration and flow in order to create a meaningful model.
However, if you don’t want to calibrate for flow, just run the acceleration tests and leave flow the same for each test (in which case you’ll input only 3 rows in the model text box). In this case, flow will be ignored when the model is used.
Similarly for acceleration – in the above example you’ll input only 4 rows in the model text box, in which case acceleration will be ignored when the model is used.
**However, make sure a triplet of values is always provided – PA value, Flow, Acceleration.**
#### Identifying the right PA:
Higher acceleration and higher flow rate PA tests are easier to identify the optimal PA as the range of “good” values is much narrower. It’s evident where the PA is too large, as gaps start to appear in the corner and where PA is too low, as the corner starts bulging.
However, the lower the flow rate and accelerations are, the range of good values is much wider. Having examined the PA tests even under a microscope, what is evident, is that if you can’t distinguish a value as being evidently better than another (i.e. sharper corner with no gaps) with the naked eye, then both values are correct. In which case, if you can’t find any meaningful difference, simply use the optimal values from the higher flow rates.
- **Too high PA**

This is a documentation from someone exploring the code and is by no means complete or even completely accurate. Please edit the parts you might find inaccurate. This is probably going to be helpful nonetheless.
- [Preset, PresetBundle and PresetCollection](https://github.com/SoftFever/OrcaSlicer/blob/main/doc/developer-reference/Preset-and-bundle.md)
This page deals with the explanation for 3 classes in the code.
## [`Preset`](../../src/libslic3r/Preset.hpp)
As the name might suggest this class deals with presets for various things. It defines an enum `Type` which basically tells you what kind of data the present contains. Below are a few explained and there corresponding UI elements
#### Note: There is a lot of outdated and legacy code in the code base.
-`TYPE_PRINT`: Refers to a process preset. It's called 'Print' probably due to some legacy code.
There are other preset types but some of them are for SLA. Which is legacy code, since SLA printers are no longer supported. Above 3 are the important types.
This is a bundle containing a few types of `PresetCollection`. One bundle has presets for some printers, filaments and some processes (TYPE_PRINT).
`PresetCollection prints`\
`PresetCollection filaments`\
`PrinterPresetCollection printers`
each one of these contains a collection of processes, filaments and printers respectively.\
#### Note: Printers, filaments and processes in the bundle don't all have to be compatible with each other. In fact all the saved presets are stored in one `PresetBundle`. The `PresetBundle` is loaded on start up. The list of filaments and processes shown for a particular printer is a subset of `filaments` and `prints` `PresetCollection`s.
### !! incomplete, possibly inaccurate, being updated with new info !!
## [`Plater`](../../src/slic3r/GUI/Plater.hpp)
Refers to the entire application. The whole view, file loading, project saving and loading is all managed by this class. This class contains members for the model viewer, the sidebar, gcode viewer and everything else.
## [`Sidebar`](../../src/slic3r/GUI/Plater.hpp)
This is relating the the sidebar in the application window
Refers to the various windows with settings. e.g. the Popup to edit printer or filament preset. Also the section to edit process preset and the object list. These 4 are managed by `TabPrinter`, `TabFilament`, `TabPrint` and `TabPrintModel` respectively.
The Slicing logic is not the easiest to locate in the code base. Below is a flow diagram of function calls that are made after clicking the `Slice Plate` button in the UI. Most of the processing happens in different threads. Note the calls after `BackgroundSlicingProcess::start()`, but this is how you can find the slicing logic.
Large format printers with print volumes in the order of 1m^3 generally use pellets for printing.
The overall tech is very similar to FDM printing.
It is FDM printing, but instead of filaments, it uses pellets.
The difference here is that where filaments have a filament_diameter that is used to calculate
the volume of filament ingested, pellets have a particular flow_coefficient that is empirically
devised for that particular pellet.
pellet_flow_coefficient is basically a measure of the packing density of a particular pellet.
Shape, material and density of an individual pellet will determine the packing density and
the only thing that matters for 3d printing is how much of that pellet material is extruded by
one turn of whatever feeding mehcanism/gear your printer uses. You can emperically derive that
for your own pellets for a particular printer model.
We are translating the pellet_flow_coefficient into filament_diameter so that everything works just like it
does already with very minor adjustments.
filament_diameter = sqrt( (4 \* pellet_flow_coefficient) / PI )
sqrt just makes the relationship between flow_coefficient and volume linear.
higher packing density -> more material extruded by single turn -> higher pellet_flow_coefficient -> treated as if a filament of larger diameter is being used
All other calculations remain the same for slicing.
This feature ensures the accurate Z height of the model after slicing, even if the model height is not a multiple of the layer height.
For example, slicing a 20mm x 20mm x 20.1mm cube with a layer height of 0.2mm would typically result in a final height of 20.2mm due to the layer height increments.
By enabling this parameter, the layer height of the last five layers is adjusted so that the final sliced height matches the actual object height, resulting in an accurate 20.1mm (as shown in the picture).
This setting controls how tall each printed layer will be. Typically, a smaller layer height produces a better-looking part with less jagged edges, especially around curved sections (like the top of a sphere). However, lower layer heights mean more layers to print, proportionally increasing print time.
### Tips:
1.**The optimal layer height depends on the size of your nozzle**. The set layer height must not be taller than 80% of the diameter of the nozzle, else there is little "squish" between the printed layer and the layer below, leading to weaker parts.
2. While technically there is no limit to how small a layer height one can use, **typically most printers struggle to print reliably with a layer height that is smaller than 20% of the nozzle diameter**. This is because with smaller layer heights, less material is extruded per mm and, at some point, the tolerances of the extruder system result in variations in the flow to such an extent that visible artifacts occur, especially if printing at high speeds.
For example, it is not uncommon to see "fish scale" type patterns on external walls when printing with a 0.4 mm nozzle at 0.08 mm layer height at speeds of 200mm/sec+. If you observe that pattern, simply increase your layer height to 30% of your nozzle height and/or slow down the print speed considerably.
# First Layer Height
This setting controls how tall the first layer of the print will be. Typically, this is set to 50% of the nozzle width for optimal bed adhesion.
### Tip:
A thicker first layer is more forgiving to slight variations to the evenness of the build surface, resulting in a more uniform, visually, first layer. Set it to 0.25mm for a 0.4mm nozzle, for example, if your build surface is uneven or your printer has a slightly inconsistent z offset between print runs. However, as a rule of thumb, try not to exceed 65% of the nozzle width so as to not compromise bed adhesion too much.
These settings control how wide the extruded lines are.
- **Default**: The default line width in mm or as a percentage of the nozzle size.
- **First Layer**: The line width of the first layer. Typically, this is wider than the rest of the print, to promote better bed adhesion. See tips below for why.
- **Outer Wall**: The line width in mm or as a percentage of the nozzle size used when printing the model’s external wall perimeters.
- **Inner Wall**: The line width in mm or as a percentage of the nozzle size used when printing the model’s internal wall perimeters.
- **Top Surface**: The line width in mm or as a percentage of the nozzle size used when printing the model’s top surface.
- **Sparse Infill**: The line width in mm or as a percentage of the nozzle size used when printing the model’s sparse infill.
- **Internal Solid Infill**: The line width in mm or as a percentage of the nozzle size used when printing the model’s internal solid infill.
- **Support**: The line width in mm or as a percentage of the nozzle size used when printing the model’s support structures.
## Tips:
1.**Typically, the line width will be anything from 100% up to 150% of the nozzle width**. Due to the way the slicer’s flow math works, a 100% line width will attempt to extrude slightly “smaller” than the nozzle size and when squished onto the layer below will match the nozzle orifice. You can read more on the flow math here: [Flow Math](https://manual.slic3r.org/advanced/flow-math).
2.**For most cases, the minimum acceptable recommended line width is 105% of the nozzle diameter**, typically reserved for the outer walls, where greater precision is required. A wider line is less precise than a thinner line.
3.**Wider lines provide better adhesion to the layer below**, as the material is squished more with the previous layer. For parts that need to be strong, setting this value to 120-150% of the nozzle diameter is recommended and has been experimentally proven to significantly increase part strength.
4.**Wider lines improve step over and overhang appearance**, i.e., the overlap of the currently printed line to the surface below. So, if you are printing models with overhangs, setting a larger external perimeter line width will improve the overhang’s appearance to an extent.
5.**For top surfaces, typically a value of ~100%-105% of the nozzle width is recommended** as it provides the most precision, compared to a wider line.
6.**For external walls, you need to strike a balance between precision and step over and, consequently, overhang appearance.** Typically these values are set to ~105% of nozzle diameter for models with limited overhangs up to ~120% for models with more significant overhangs.
7.**For internal walls, you typically want to maximize part strength**, so a good starting point is approximately 120% of the nozzle width, which gives a good balance between print speed, accuracy, and material use. However, depending on the model, larger or smaller line widths may make sense in order to reduce gap fill and/or line width variations if you are using Arachne.
8.**Don’t feel constrained to have wider internal wall lines compared to external ones**. While this is the default for most profiles, for models where significant overhangs are present, printing wider external walls compared to the internal ones may yield better overhang quality without increasing material use!
9.**For sparse infill, the line width also affects how dense, visually, the sparse infill will be.** The sparse infill aims to extrude a set amount of material based on the percentage infill selected. When increasing the line width, the space between the sparse infill extrusions is larger in order to roughly maintain the same material usage. Typically for sparse infill, a value of 120% of nozzle diameter is a good starting point.
10.**For supports, using 100% or less line width will make the supports weaker** by reducing their layer adhesion, making them easier to remove.
11.**If your printer is limited mechanically, try to maintain the material flow as consistent as possible between critical features of your model**, to ease the load on the extruder having to adapt its flow between them. This is especially useful for printers that do not use pressure advance/linear advance and if your extruder is not as capable mechanically. You can do that by adjusting the line widths and speeds to reduce the variation between critical features (e.g., external and internal wall flow). For example, print them at the same speed and the same line width, or print the external perimeter slightly wider and slightly slower than the internal perimeter. Material flow can be visualized in the sliced model – flow drop down.
Unless printed in spiral vase mode, every layer needs to begin somewhere and end somewhere. That start and end of the extrusion is what results in what visually looks like a seam on the perimeters. This section contains options to control the visual appearance of a seam.
- **Seam Position**: Controls the placement of the seam.
1.**Aligned**: Will attempt to align the seam to a hidden internal facet of the model.
2.**Nearest**: Will place the seam at the nearest starting point compared to where the nozzle stopped printing in the previous layer.
3.**Back**: Will align the seam in a (mostly) straight line at the rear of the model.
4.**Random**: Will randomize the placement of the seam between layers.
Typically, aligned or back work the best, especially in combination with seam painting. However, as seams create weak points and slight surface "bulges" or "divots," random seam placement may be optimal for parts that need higher strength as that weak point is spread to different locations between layers (e.g., a pin meant to fit through a hole).
- **Staggered Inner Seams**: As the seam location forms a weak point in the print (it's a discontinuity in the extrusion process after all!), staggering the seam on the internal perimeters can help reduce stress points. This setting moves the start of the internal wall's seam around across layers as well as away from the external perimeter seam. This way, the internal and external seams don't all align at the same point and between them across layers, distributing those weak points further away from the seam location, hence making the part stronger. It can also help improve the water tightness of your model.
- **Seam Gap**: Controls the gap in mm or as a percentage of the nozzle size between the two ends of a loop starting and ending with a seam. A larger gap will reduce the bulging seen at the seam. A smaller gap reduces the visual appearance of a seam. For a well-tuned printer with pressure advance, a value of 0-15% is typically optimal.
- **Scarf Seam**: Read more here: [Better Seams - An Orca Slicer Guide](https://www.printables.com/model/783313-better-seams-an-orca-slicer-guide-to-using-scarf-s).
- **Role-Based Wipe Speed**: Controls the speed of a wipe motion, i.e., how fast the nozzle will move over a printed area to "clean" it before traveling to another area of the model. It is recommended to turn this option on, to ensure the nozzle performs the wipe motion with the same speed that the feature was printed with.
- **Wipe Speed**: If role-based wipe speed is disabled, set this field to the absolute wipe speed or as a percentage over the travel speed.
- **Wipe on Loops**: When finishing printing a "loop" (i.e., an extrusion that starts and ends at the same point), move the nozzle slightly inwards towards the part. That move aims to reduce seam unevenness by tucking in the end of the seam to the part. It also slightly cleans the nozzle before traveling to the next area of the model, reducing stringing.
- **Wipe Before External Perimeters**: To minimize the visibility of potential over-extrusion at the start of an external perimeter, the de-retraction move is performed slightly on the inside of the model and, hence, the start of the external perimeter. That way, any potential over-extrusion is hidden from the outside surface.
This is useful when printing with Outer/Inner or Inner/Outer/Inner wall print order, as in these modes, it is more likely an external perimeter is printed immediately after a de-retraction move, which would cause slight extrusion variance at the start of a seam.
## Tips:
With seams being inevitable when 3D printing using FFF, there are two distinct approaches on how to deal with them:
1.**Try and hide the seam as much as possible**: This can be done by enabling scarf seam, which works very well, especially with simple models with limited overhang regions.
2.**Try and make the seam as "clean" and "distinct" as possible**: This can be done by tuning the seam gap and enabling role-based wipe speed, wipe on loops, and wipe before the external loop.
## Troubleshooting Seam Performance:
The section below will focus on troubleshooting traditional seams. For scarf seam troubleshooting, refer to the guide linked above.
There are several factors that influence how clean the seam of your model is, with the biggest one being extrusion control after a travel move. As a seam defines the start and end of an extrusion, it is critical that:
1.**The same amount of material is extruded at the same point across layers** to ensure a consistent visual appearance at the start of a seam.
2.**The printer consistently stops extruding at the same point** across layers.
However, due to mechanical and material tolerances, as well as the very nature of 3D printing with FFF, that is not always possible. Hopefully with some tuning you'll be able to achieve prints like this!
Imagine the scenario where the toolhead finishes printing a layer line on one side of the bed, retracts, travels the whole distance of the bed to de-retract, and starts printing another part. Compare this to the scenario where the toolhead finishes printing an internal perimeter and only travels a few mm to start printing an external perimeter, without even retracting or de-retracting.
The first scenario has much more opportunity for the filament to ooze outside the nozzle, resulting in a small blob forming at the start of the seam or, conversely, if too much material has leaked, a gap/under extrusion at the start of the seam.
The key to a consistent start of a seam is to reduce the opportunity for ooze as much as possible. The good news is that this is mostly tunable by:
1.**Ensure your pressure advance is calibrated correctly**. A too low pressure advance will result in the nozzle experiencing excess pressure at the end of the previous extrusion, which increases the chance of oozing when traveling.
2.**Make sure your travel speed is as fast as possible within your printer's limits**, and the travel acceleration is as high as practically possible, again within the printer's limits. This reduces the travel time between features, reducing oozing.
3.**Enable wipe before external perimeters**– this setting performs the de-retraction move inside the model, hence reducing the visual appearance of the "blob" if it does appear at the seam.
4.**Increase your travel distance threshold to be such that small travel moves do not trigger a retraction and de-retraction operation**, reducing extrusion variances caused by the extruder tolerances. 2-4mm is a good starting point as, if your PA is tuned correctly and your travel speed and acceleration are high, it is unlikely that the nozzle will ooze in the milliseconds it will take to travel to the new location.
5.**Enable retract on layer change**, to ensure the start of your layer is always performed under the same conditions – a de-pressurized nozzle with retracted filament.
In addition, some toolhead systems are inherently better at seams compared to others. For example, high-flow nozzles with larger melt zones usually have poorer extrusion control as more of the material is in a molten state inside the nozzle. They tend to string more, ooze easier, and hence have poorer seam performance. Conversely, smaller melt zone nozzles have more of the filament solid in their heat zone, leading to more accurate extrusion control and better seam performance.
So this is a trade-off between print speed and print quality. From experimental data, volcano-type nozzles tend to perform the worst at seams, followed by CHT-type nozzles, and finally regular flow nozzles.
In addition, larger nozzle diameters allow for more opportunity for material to leak compared to smaller diameter nozzles. A 0.2/0.25 mm nozzle will have significantly better seam performance than a 0.4, and that will have much better performance than a 0.6mm nozzle and so forth.
### Troubleshooting the End of a Seam:
The end of a seam is much easier to get right, as the extrusion system is already at a pressure equilibrium while printing. It just needs to stop extruding at the right time and consistently.
**If you are getting bulges at the seam**, the extruder is not stopping at the right time. The first thing to tune would be **pressure advance**– too low of a PA will result in the nozzle still being pressurized when finishing the print move, hence leaving a wider line at the end as it stops printing.
And the opposite is true too –**too high PA will result in under extrusion at the end of a print move**, shown as a larger-than-needed gap at the seam. Thankfully, tuning PA is straightforward, so run the calibration tests and pick the optimal value for your material, print speed, and acceleration.
Furthermore, the printer mechanics have tolerances – the print head may be requested to stop at point XY but practically it cannot stop precisely at that point due to the limits of micro-stepping, belt tension, and toolhead rigidity. Here is where tuning the seam gap comes into effect. **A slightly larger seam gap will allow for more variance to be tolerated at the end of a print move before showing as a seam bulge**. Experiment with this value after you are certain your PA is tuned correctly and your travel speeds and retractions are set appropriately.
Finally, the techniques of **wiping can help improve the visual continuity and consistency of a seam** (please note, these settings do not make the seam less visible, but rather make them more consistent!). Wiping on loops with a consistent speed helps tuck in the end of the seam, hiding the effects of retraction from view.
### The Role of Wall Ordering in Seam Appearance:
The order of wall printing plays a significant role in the appearance of a seam. **Starting to print the external perimeter first after a long travel move will always result in more visible artifacts compared to printing the internal perimeters first and traveling just a few mm to print the external perimeter.**
For optimal seam performance, printing with **inner-outer-inner wall order is typically best, followed by inner-outer**. It reduces the amount of traveling performed prior to printing the external perimeter and ensures the nozzle is having as consistent pressure as possible, compared to printing outer-inner.
<p>A 3D printer slicer forked from Bambu Studio, PrusaSlicer, and SuperSlicer with many more printer profiles, helpful calibration prints, and many more features to get your 3D printer printing perfectly!</p>
<p>A powerful, free and open-source 3D printer slicer that features cutting-edge technology.</p>
Some files were not shown because too many files have changed in this diff
Show More
Reference in New Issue
Block a user
Blocking a user prevents them from interacting with repositories, such as opening or commenting on pull requests or issues. Learn more about blocking a user.