 501aff7e53
- Replace monolithic belt rotation transform with independent per-axis
    shear controls (mode/angle/source-axis for X, Y, Z) and G-code axis
    remapping, giving full flexibility to match any belt printer's
    coordinate system
  - Remove all rotation mode logic and intermediate type+axes dropdowns,
    simplifying the pipeline to pure shear matrices while preserving the
    default behavior (Y += Z*cot(45deg) with identity remap)
  - Clean up GCodeWriter, GCodeProcessor, and GCodeViewer for the new
    shear-only model; expose 12 new settings in printer UI via
    Tab.cpp/Preset.cpp

Implement belt printer tilted slicing

Implement the core belt slicing pipeline that makes the slicer
tilt-aware:

Step 1: GCodeWriter::to_machine_coords() - R(+alpha, X) rotation
  from slicing frame to machine frame
Step 2: PrintObject - belt-rotated object height calculation
  (y*sin(a) + z*cos(a)) for correct layer count
Step 3: PrintObjectSlice - apply R(-alpha, X) rotation trafo so
  horizontal slice planes correspond to belt-parallel planes,
  with Z-shift computed from model volumes
Step 4: GCodeProcessor - machine-frame preview (no transform needed)
Step 5: 3DBed - rotate bed visualization about X by belt angle

Fix: belt surface IS the build plate, no mesh rotation

Currently still slicing perpendicular to the belt normal.  Need to figure out why.

Fix G-code Z sign: use R(-alpha, X) so Z+ is away from belt

The previous R(+alpha, X) transform produced negative Z values
(-y*sin(a) term dominated). Changed to R(-alpha, X) which gives
machine_z = y*sin(a) + z*cos(a), always positive for points
above the belt surface. Z increases with each layer as expected.

reverting and changing slice methodology

Add pink slicing direction arrow from origin

Shows the effective slicing direction (gantry normal) as a pink
arrow from the origin. Shorter and wider than the gravity arrow.
Direction: R(+alpha, X) * Z = (0, -sin(a), cos(a)), which is
the layer stacking direction in the original mesh frame.

Fix slicing arrow visibility and add raw G-code toggle

- Disable depth test for pink slicing arrow so it renders on top of
  the tilted bed geometry (was being occluded)
- Remove unnecessary 5mm Z-offset from arrow position
- Add m_belt_show_raw toggle to GCodeViewer
- Add "Show raw G-code (slicing frame)" checkbox in legend when
  belt mode is active

Implement to_machine_coords inverse rotation for belt printer G-code

The slicing pipeline rotates the mesh by R(-alpha, X) and shifts Z to
start at 0. The G-code output now undoes this transform via
to_machine_coords: R(+alpha, X) * T(0,0,+z_shift), recovering the
original machine-frame coordinates where Y is horizontal and Z is
vertical.

Changes:
- GCodeWriter: implement to_machine_coords with inverse rotation + Z-shift
- GCodeWriter: add belt_z_shift member and setter/getter
- GCode.cpp: compute Z-shift from print objects (same logic as
  PrintObjectSlice) and pass to writer; write z_shift to G-code header
- GCodeProcessor: parse belt_z_shift from G-code header
- GCodeViewer: store belt_z_shift from processor result

Wire raw G-code toggle to apply slicing-frame view transform

When "Show raw G-code (slicing frame)" is checked in the preview
legend, the view matrix is modified to apply R(-alpha, X) * T(0,0,-z_shift)
to the toolpath rendering. This shows the G-code as it was during
slicing: rotated part with horizontal layers.

Default (unchecked): machine-frame view — upright part with tilted layers.

Remove belt printer placeholder comment from GCodeProcessor

The preview now correctly displays machine-frame G-code with the
optional raw view toggle. No transform is needed in the processor.


OrcaSlicer: an open source Next-Gen Slicing Software for Precision 3D Prints.
Optimize your prints with ultra-fast slicing, intelligent support generation, and seamless printer compatibility—engineered for perfection.
Official links and community
Official Website:
Github Repository:

Follow us:

Join our Discord community:

|
⚠️ CAUTION: Several clickbait and malicious websites, such as orca-slicer[.]com and orcaslicer[.]net, are pretending to be the official OrcaSlicer site. These sites may redirect you to dangerous downloads or contain misleading information. Our only official website is www.orcaslicer.com. If you come across any of these in search results, please report them as unsafe or phishing to help keep the community secure with: - Google Safe Browsing - Microsoft Security Intelligence - IPThreat |
Main features
- Advanced Calibration Tools
Comprehensive suite: temperature towers, flow rate, retraction & more for optimal performance. - Precise Wall and Seam Control
Adjust outer wall spacing and apply scarf seams to enhance print accuracy. - Sandwich Mode and Polyholes Support
Use varied infill patterns and accurate hole shapes for improved clarity. - Overhang and Support Optimization
Modify geometry for printable overhangs with precise support placement. - Granular Controls and Customization
Fine-tune print speed, layer height, pressure, and temperature with precision. - Network Printer Support
Seamless integration with Klipper, PrusaLink, and OctoPrint for remote control. - Mouse Ear Brims & Adaptive Bed Mesh
Automatic brims and adaptive mesh calibration ensure consistent adhesion. - User-Friendly Interface
Intuitive drag-and-drop design with pre-made profiles for popular printers. - Open-Source & Community Driven
Regular updates fueled by continuous community contributions. - Wide Printer Compatibility
Supports a broad range of printers: Bambu Lab, Prusa, Creality, Voron, and more. - Additional features can be found in the change notes.
Wiki
The wiki aims to provide a detailed explanation of the slicer settings, including how to maximize their use and how to calibrate and set up your printer.
Download
Stable Release
📥 Download the Latest Stable Release
Visit our GitHub Releases page for the latest stable version of OrcaSlicer, recommended for most users.
Nightly Builds
🌙 Download the Latest Nightly Build
Explore the latest developments in OrcaSlicer with our nightly builds. Feedback on these versions is highly appreciated.
How to install
Windows
Download the Windows Installer exe for your preferred version from the releases page.
-
For convenience there is also a portable build available.
Troubleshooting
- If you have troubles to run the build, you might need to install following runtimes:
- MicrosoftEdgeWebView2RuntimeInstallerX64
- vcredist2019_x64
- Alternative Download Link Hosted by Microsoft
- This file may already be available on your computer if you've installed visual studio. Check the following location:
%VCINSTALLDIR%Redist\MSVC\v142
Windows Package Manager
winget install --id=SoftFever.OrcaSlicer -e
Mac
-
Download the DMG for your computer:
arm64version for Apple Silicon andx86_64for Intel CPU. -
Drag OrcaSlicer.app to Application folder.
-
If you want to run a build from a PR, you also need to follow the instructions below:
Quarantine
-
Option 1 (You only need to do this once. After that the app can be opened normally.):
- Step 1: Hold cmd and right click the app, from the context menu choose Open.
- Step 2: A warning window will pop up, click Open
-
Option 2: Execute this command in terminal:
xattr -dr com.apple.quarantine /Applications/OrcaSlicer.app -
Option 3:
- Step 1: open the app, a warning window will pop up
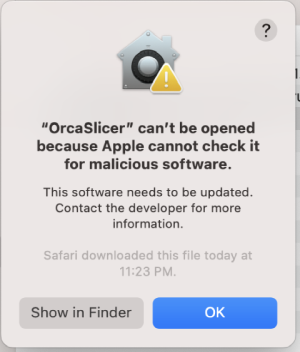
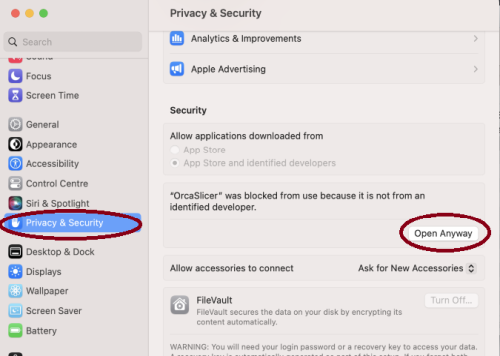
- Step 2: in
System Settings->Privacy & Security, clickOpen Anyway:
- Step 1: open the app, a warning window will pop up
-


Linux (Ubuntu)
- If you run into trouble executing it, try this command in the terminal:
chmod +x /path_to_appimage/OrcaSlicer_Linux.AppImage
How to Compile
All updated build instructions for Windows, macOS, and Linux are now available on the official OrcaSlicer Wiki - How to build page.
Please refer to the wiki to ensure you're following the latest and most accurate steps for your platform.
Klipper Note
If you're running Klipper, it's recommended to add the following configuration to your printer.cfg file.
# Enable object exclusion
[exclude_object]

# Enable arcs support
[gcode_arcs]
resolution: 0.1
Supports
OrcaSlicer is an open-source project and I'm deeply grateful to all my sponsors and backers.
Their generous support enables me to purchase filaments and other essential 3D printing materials for the project.
Thank you! :)
Sponsors:

|

|
Backers:
Ko-fi supporters ☕: Backers list
Support me



Some Background
Open-source slicing has always been built on a tradition of collaboration and attribution. Slic3r, created by Alessandro Ranellucci and the RepRap community, laid the foundation. PrusaSlicer by Prusa Research built on Slic3r and acknowledged that heritage. Bambu Studio in turn forked from PrusaSlicer, and SuperSlicer by @supermerill extended PrusaSlicer with community-driven enhancements. Each project carried the work of its predecessors forward, crediting those who came before.
OrcaSlicer began in that same spirit, drawing from BambuStudio, PrusaSlicer, and ideas inspired by CuraSlicer and SuperSlicer. But it has since grown far beyond its origins. Through relentless innovation — introducing advanced calibration tools, precise wall and seam control, tree supports, adaptive slicing, and hundreds of other features — OrcaSlicer has become the most widely used and actively developed open-source slicer in the 3D printing community. Many of its innovations have been adopted by other slicers, making it a driving force for the entire industry.
The OrcaSlicer logo was designed by community member Justin Levine (@freejstnalxndr).
License
- OrcaSlicer is licensed under the GNU Affero General Public License, version 3.
- The GNU Affero General Public License, version 3 ensures that if you use any part of this software in any way (even behind a web server), your software must be released under the same license.
- OrcaSlicer includes a pressure advance calibration pattern test adapted from Andrew Ellis' generator, which is licensed under GNU General Public License, version 3. Ellis' generator is itself adapted from a generator developed by Sineos for Marlin, which is licensed under GNU General Public License, version 3.
- The Bambu networking plugin is based on non-free libraries from BambuLab. It is optional to the OrcaSlicer and provides extended functionalities for Bambulab printer users.